Radio Drama: Create your own horror radio play (Part 2)

This term, the year 6 classes are studying Radio Drama. I have posted previously about how they created radio commercials to explore the creative potential of the voice. We also had a chance to perform poems to apply characterisation techniques to voice. Then we attempted to develop better enunciation and articulation by performing tongue-twister poems in this tongue-twisting lesson. The class also had the opportunity to explore voice projection and create their own radio interviews.

To sum up this unit of work, and to allow for summative assessment of MYP Criterion B (Application), the class will have the opportunity to create their own horror radio plays (as inspired by Orson Welles’ War of the Worlds). The task’s learning objective is to apply the skills, techniques and processes used to create a radio drama performance. This task was planned to span over two weeks (one double-period per week). Last week, I posted about the first week of the task, where the students wrote their stories and brainstormed possible sound effects and background music to accompany the narration.
This week, we moved on to the next part of the drama process: to apply rehearsal strategies  and to reflect on and evaluate our artwork (process and product). The warmup for the lesson was a radio drama rehearsal game that I always enjoy: the students move into their groups and rehearse their radio plays five different times, each time with a different focus: once in normal speed, once in super slow motion (to force them to clearly pronouncing each vowel and consonant), once in fast forward (a very fun and tongue-twisting articulation and enunciation exercise), once as a comedy (to get them to think about tone and emotions in voice), and once as a musical (to help them warmup their voices and think about tone and emotions in voice). The students were encouraged to record their rehearsals using their iPods, listen to them and reflect on their characterisation, enunciation and voice projection. This warmup exercise achieves several objectives: to help students warmup, to rehearse for their performances, and to become more confident and ready for performing in front of the audience. The debriefing that followed the warmup was designed to ensure that the students take meaning out of this exercise (other than it just being ‘fun’) and reflect on it.
After the warmup and debriefing, the students sat in front of the performance space and formed an audience. Each group subsequently hid behind a curtain set up for the task, and delivered their horror radio play. The audience would then be asked to think like critics and give feedback (positive comments or useful suggestions) for the performers. Each radio play was recorded using my iPad. After all performances, the students were asked to bring out their task sheet and rubric from their drama folders (handed out to them last week). We then heard all the recorded performances through the class projector to help each student reflect on and evaluate his/her performance. Each student listened to his/her group’s performance, used the self-assessment checklist in the task sheet to self-assess, and then gave themselves a mark out of ten using the rubric attached to the task-sheet (in the ‘student’s self assessment’ column). 
After the self-assessment and evaluation, I had the opportunity to quickly conference with each student (for one or two minutes) and allow them to reflect orally on the process and product and justify their self-assessment. I concluded the conference with assigning each student his/her mark in the teacher self-assessment column and giving them oral feedback. 
It was a very busy lesson, with lots to do! However, I believe the task as a whole was a huge success and the students seemed very engaged with it. I believe this task can also be adapted and used in a non-drama classroom: English/ESL, LOTE, even Humanities classrooms where students create radio plays about social issues.
Below are embedded clips of the best three performances, as well as screenshots of the self-assessment checklist, the adapted MYP rubric used, and the whiteboard.

Slapstick Comedy: Step three of the drama process!

The year 7 and 8 classes are studying a unit of work on ‘Slapstick Comedy’. I have posted previously about how we explored the concept of humour in general, and how we defined slapstick comedy. Two weeks ago, we kick-started the drama process and began brainstorming for our performances, and we had the opportunity to write up the scripts and draw up the storyboards for the performances
This week we moved on to step three of the drama process: rehearsal. The lesson started with a quick warmup called Status Pictures, where the students form still-images depicting situations involving characters of different status. This warm-up was chosen to get students thinking about status relationships and how they are used in slapstick comedy to create humour. After the warmup and debriefing session that followed, I recapped on the theoretical part of the unit which was written on the whiteboard (pictured below); then the students moved into their groups (or ‘theatre companies’) and were each given a rehearsal handout (A4 size) and an A3 size Rehearsal Log. I circulated around each group to check their progress and to recap over the rehearsal process: what is its importance and how can it be used effectively?
The students spread around the drama room (some groups moved outside into the courtyard) and they each rehearsed a few times. The groups were told to choose a different focus for every rehearsal (e.g. body language, or blocking, or voice etc…), to fill out the rehearsal log after every rehearsal to reflect on it, and to document their rehearsals with photos and some video footage (using smart-phones/iPods for year 8s, or iPads for the year 7s). The students were also told to keep evidence of their rehearsal in their portfolios: e.g. annotated pictures from rehearsal (printed from classroom printer) and the rehearsal log. For the year 7 students, who all have iPads, this evidence was just added to their shared Evernote notebook which they used as their group portfolio
The rehearsal process seemed to go rather efficiently, and everyone had a meaningful role as each student was either acting out in rehearsal, or taking photos/shooting video, or filling out the rehearsal log. The groups also seemed much more committed to the rehearsal process due to of having a different focus for every rehearsal. Below are some snapshots of the rehearsal logs of a couple of ‘theatre companies’, a snapshot of the whiteboard, and a screenshot of an Evernote portfolio from one of the year 7 groups.
Next week, we move into the final two steps of the drama process: performance, followed by reflection and evaluation. Stay tuned ladies and gentlemen!

Slapstick Comedy: Step two of the drama process!

The year 7 and 8 classes are studying a unit of work on ‘Slapstick Comedy’. I have posted previously about how we explored the concept of humour in general, and how we defined slapstick comedy. Last week, we kick-started the drama process and began brainstorming for our performances

This week, the ‘theatre companies’ (the fancy name I use for my drama groups) finalised their brainstorms and started writing their scripts and creating their storyboards. The script-writing process was mainly driven by each group’s ‘writer’, while the story-boarding was mainly driven by the group’s ‘director’. The year 7 classes had to do this on their iPads and attach evidence to their group portfolio on Evernote. The year 8 classes (who do not have iPads) were each given a group folder to use as their portfolio for the task. The lesson’s learning objective is to ‘apply the skills, techniques and processes used to create slapstick comedy performances’.
The lesson’s warmup was a game I found on The Drama Notebook called ‘Queen of Hearts’. This game is designed to get students to think about status, as each student is assigned a card from a deck of cards. Each card represents a different character in a medieval royal court, and the higher the card the higher the status of the character. The students then mill about the room, walking and relating to others in character. The class then had a quick debriefing session about the warmup and we related it to the use of status relationships in slapstick comedy to add to the humour, either by overly exaggerating those relationships or challenging them. We also talked about other ways to create character in slapstick comedy, such as creating dominant negative personality traits for each character and designing bizarre over-the-top costumes.
To start the second step of the drama process, which is preparing the script and storyboard, the students used this template which I adapted from a worksheet I stumbled into by accident through a Google search of ‘drama worksheets’ (the Internet is MY BEST FRIEND). The students had to use what we have learned about slapstick comedy so far in their script-writing process (e.g. they must incorporate some slapstick techniques like the trip, slip, collide, double-take, stuck, and lazzi; they must use slow-motion to add dramatic effect to these techniques; and they were also encouraged to use status, personality traits and costumes to add comic potential to their characters). Here are snapshots of one group’s script and storyboard:

Next week, we move into the third step of the drama process, which is ‘to rehearse’. The students will be using a template for blocking and rehearsing, and they will also be using their iPods/iPads/smart-phones to document their rehearsals and reflect on their acting to refine and polish their performances. Stay tuned!

Radio Drama: Create your own Radio Interview!

The year 6 classes are studying Radio Drama. I have posted previously about how they created radio commercials to explore the creative potential of the voice. We also had a chance to perform poems to apply characterization techniques to voice. Then we attempted to develop better enunciation and articulation by performing tongue-twister poems in this tongue-twisting lesson.

The next lesson in this unit of work is ‘radio interviews’. The learning objectives for this lesson are:
1) to develop better voice projection
2) to create a radio interview

The warmup chosen was a voice-projection exercise where the students form pairs and then line up facing each other. The pairs then start a conversation, until they are instructed to move three feet away from each other, and continue the conversation. After about 30 seconds, they move another three feet away from each other, and so on. After the warmup, we debriefed as a class to explore the benefits of this warmup, and the skills it allows us to practice, and how it linked to voice projection.

After the debriefing, I explained the new theoretical material for the lesson. I explained what voice projection is and how performers can use certain strategies to improve their voice projection. The students were told that they will have an opportunity to practice those strategies through a simple performance exercise: radio interviews.

The task required the students to form groups of 3-4 members, pick a celebrity/cartoon-character to interview and write up five questions and answers. Each group had to have 1 or 2 radio hosts asking the questions, and the remaining group members play the chosen character/characters or celebrity/celebrities who answer the questions (in character). Each performance also had to include a jingle for the radio station, created by the students’ voices.

The students were told that for this performance the audience members will sit at the very back end of the room (as far away from the performance space as possible), and so the performers really had to project their voice if they want to be heard.

The task was very engaging for the students. One group interviewed Spongebob Squarepants, and another interviewed Bart Simpson. Most of the boys decided to interview famous sports-stars I haven’t even heard of (sports isn’t really my strong point)! The audience members gave the performers positive comments and useful suggestions after every performance, because I like to allow my students to step into the “critic’s shoes”. To wrap up the lesson, the students had to write an ‘exit slip‘ explaining what they learned today and what they found enjoyable.

Overall, the lesson was a success, the students created some fantastic performances, and most groups projected their voice well enough! This lesson can also be adapted and used in any subject: interviewing a scientist in Science, a mathematician in Maths, a book author in English/ESL/LOTE etc…

Here is a radio interview created by a group of girls who decided to interview Bart Simpson. There is also a snapshot of the whiteboard, and some of the exit slips!

Kick-starting the drama process: Slapstick Comedy!

So, over the past few weeks, the year 7s and year 8s were exploring humor in general and then moved on to defining slapstick comedy. This week’s lesson was an introduction to the slapstick techniques that they can incorporate in their performance: the trip, the slip, the collide, the stuck, the double-take, and lazzi (comic accidents). We discussed each of these techniques and we got a chance to apply them. We also highlighted the importance of slow motion to add dramatic effect and for the actors to stay safe.

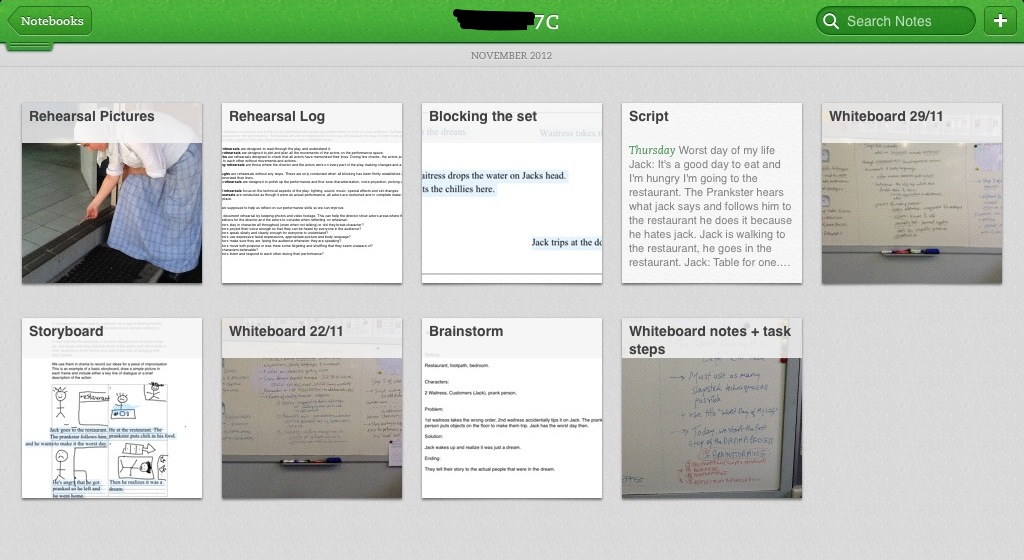
The warm-up for the lesson was a One-Sentence-Story with the title “The Worst Day of My Life”. We all sat in a circle and every student had to add one sentence to the story. This warm-up was chosen to get them to think about accidents and mishaps, which is what slapstick is mostly about, and as a preparation for the assessment task to follow. The students then moved into groups and were told that we will start the first step of the drama process this week to prepare a slapstick comedy performance titled “The Worst Day of My Life”. They had to decide on who is going to be the group’s writer and who will be the director for this performance. The students are aware that the first step of the drama process is to brainstorm, and I used this story-map graphic organizer from Education Oasis to get them to think about their performance. Here is a snap-shot of one of the groups’ story-maps.

During the course of the coming few weeks we will move into the remaining steps of the drama process, which is to prepare a script and a storyboard for their performance, followed by the third step, to rehearse and polish their performance, then to perform in front of an audience and receive feedback, then to reflect & evaluate. Each of these steps will require certain evidence being documented in the group’s portfolio for this task. The year 7 students are also doing the same task but they are using their iPads to prepare their portfolio.

Stay tuned for next week’s lesson, where we move on to scripting and story-boarding the performance (some groups already started this step because they were so excited)! We will also focus on the role of costumes, personality traits, and status in slapstick comedy to help the students create slapstick characters when writing up their performances!

Introducing Slapstick Comedy to the year 7s!

Today, we started a new unit of work on ‘Slapstick Comedy’. This unit of work is designed for the year seven group. The students had a quick circle warm-up where one student would call-out an emotion and the rest would mirror that emotion with a lot of exaggeration, using body language, facial expressions, gestures, poses. The students laughed a lot at some of the responses.

After a quick debriefing/oral reflection about the warm-up and the skills involved, the students were divided into groups of 3 or 4 participants, and each given a piece of poster paper and a few markers. The students had to then watch ‘Gangnam Style‘ and respond to these three questions (which I prepared earlier as a Tumblr post). While the brainstorming questions are not necessarily focused on ‘slapstick comedy’ per se, the aim was to get students to deconstruct humour in general and what makes certain things ‘funny’. These questions are from Tom March’s Look-to-Learn Tumblr blog.

While the students were responding to the three questions on the poster paper, one member of each group was withdrawn to bring their iPad and access the typewith.me EtherPad and input their group’s responses. The students were very engaged and keen to see each group’s response as they were writing it. Here is a screenshot of their responses and a photo of the brainstorm posters.

We then had a quick discussion about their responses and arrived at the unit of work’s ‘significant concept’ which is: Different people laugh at different things. The class followed that with a discussion of the unit of work’s ‘area of interaction focus’ and ‘MYP unit question’. To conclude the lesson, we had a quick reflection activity where the students set three personal learning goals for this unit of work, in written format. The lesson was quite engaging, made use of ICT and incorporated group-work, brainstorming, discussion and reflection. Next week, we will focus more on slapstick comedy and define it and start looking at its features/elements.