Aside

D-ram-ata: Using Data in the Drama Classroom!

Screen Shot 2014-02-10 at 2.50.34 pm

Self-assessment and peer-assessment play a very important role in the Drama classroom. Getting into the habit of constantly reflecting on one’s performances and the performances of others is paramount to learning how to think like an artist. Ever since the introduction of iPads in our school, I have made use of eLearning tools to facilitate the processes of self-assessment and peer-assessment in my drama classes. One of my favorite tools is Google Forms.

Before class, I would create a form with the indicators that need to be self- or peer-assessed (examples of each attached: peer assessment form and self assessment form), and then QR-code the link to these forms. Before the performances, students would scan the QR code and gain access to the Google Form. I would instruct them to read the form and have a think about the criteria upon which they are assessing themselves and/or their classmates. After watching the performances, students would then fill out the relevant form and click ‘Submit’.

When I started using Google Forms, the process would end there: clicking ‘Submit’. I would then encourage them to write a short reflection on their self- or peer-assessment and keep it in their folios. However, I felt like this data that I’m collecting in spreadsheets is so valuable and gives me such a great insight into the students’ feelings about their creations in the drama classroom (my undergrad degree had a huge ‘statistics component’ so I actually get really excited about ‘data’!).

I wanted to share those insights with the students, but didn’t really know how to make it relevant. Until one day, I decided to actually show my students the ‘summary of their responses’ (I have attached a PDF of such a summary generated by Google Forms, scroll down to see how data is represented visually). Google Forms has a wonderful feature where it summarises responses as bar-charts, and I showed these bar-charts to the students. Their initial reaction was: ‘Sirrrrr this is DRAMA not MATHS!’ We looked at some of these indicators and discussed the meaning of the data. What does it mean when the indicator ‘I projected my voice well enough during my performance’ got a 50% response of ‘sometimes’, and a 25% response of ‘usually’? It means that we need to have a discussion about voice projection and ways to improve it! So, we started going through these bar-charts and discussing the areas where we, as a class, may need to work on, whether it’s voice projection, or use of the performance space, or use of facial expressions.

I have found that this approach really got the students thinking about indicators they need to pay more attention to in order to develop as performing artists. The students realized that they weren’t alone, and that there are others in the classroom who struggle with the same skills, and it was done anonymously through Google’s wonderful ‘summary of responses’ feature! The students now actually request that I show them a summary of the responses whenever we use Google Forms in the drama class!

It has been said that feedback is the main driver behind learning; and this is a great example of how data can be used to give meaningful and timely feedback that can move the students’ learning forward!

10 ways I use Google Forms in my tablet classroom

This is my second blogpost for the Oxford University Press ELT Blog. It is about using Google Forms in the tablet/iPad classroom.

OUPELTGlobal

Mohamed El-Ashiry takes a look at ways of using Google Forms in the classroom.

I am one of Google Forms‘ biggest fans! I have many reasons to love the service, and I use it in many different ways.

While there have been many other advantages, the biggest advantage of using Google Forms in my classroom is being able to give students immediate feedback. I often connect my tablet to the projector, and hide the column displaying the names of students submitting their responses (whether they are responding to a test, or self-assessment or peer-assessment, etc.). The students like to see the spreadsheet being populated by all their submissions. We use this as an evaluation and feedback exercise after a test or quiz, for example: we look at each question and together agree on the most accurate and well-written responses. This is also a very useful literacy-building exercise because we…

View original post 1,080 more words

Warning: Drama Teacher Burnout!

It’s been a while since my last post. I have had one of the busiest terms I have ever experienced in my whole teaching career! I have also had one of the most draining. A huge part of that ‘drain’ has been more a result of my ‘perfectionism’ than anything else. I am very aware of that, and I now realize more than ever that it needs to stop otherwise I will experience burn-out, because I am very close to it…

I take a ‘drama process’ approach to teaching drama. I coined the steps of that process as follows: planning, preparing, rehearsing, performing, reflecting & evaluating. Previously, I used to expect students to produce written evidence for every step of that process for one major performance at the end of the unit-of-work. However, that disengaged students because it was “too much writing” for only a two-minute performance, and I have to agree.

This term, I tried to adjust my expectations a little bit. I started only asking for evidence of planning or preparing or rehearsing pre-performance, and of reflecting or evaluating post-performance. So an example lesson would look like this: a quick warmup followed by a debriefing, then a discussion of the new content/concepts, then a quick performance task to apply the new content/concepts. All students would have to prepare a quick brainstorm (as evidence of planning), or write a short script or draw a storyboard (as evidence of preparing), or fill-out a rehearsal log (as evidence of rehearsing). After watching all performances and giving/receiving feedback, all students would then either write a reflection or self-evaluation or use a self-assessment checklist (as evidence of reflecting & evaluating).

This seems like a very manageable lesson plan. However, I only see the students for one double-period a week, so that’s a total of 86 minutes. For me to get through that whole planned lesson in 86 minutes, I would end up being very cranky and snappy and rather impatient, which is unfair to the students. Drama is a noisy and loud classroom, and is a highly-stimulating subject for both the students and teacher. Students take time to think and then write and then transition between activities. While I have managed to get through the planned lesson several times with many classes, I would end up feeling very tired and drained by the end of the lesson. This is worse on Tuesdays, where I have three double-periods of drama in one day! Also, the lesson does not necessarily cater for all students’ learning styles as I’d like to believe.

So I have decided:

1- I will not to be over-ambitious, not because my students can’t handle it, but just because it will burn me out.
2- I need to let go of control a little bit, and relax.
3- I need to give students more time to enjoy the practical activities and the noise and loudness associated with them.
4 I need to give students more choice as to how they want to produce evidence of their learning: one group member might want to write a reflection after performing, while the other might prefer to draw a storyboard before performing. I need to allow those choices, as opposed to force everyone to write a script, or draw a storyboard. Students learn differently!
5- Every week, I will alternate between pre-performance evidence, like brainstorms, scripts, storyboards, and rehearsal logs; and post-performance evidence, like self-assessments, self-evaluations, and written reflections.
6- When asked to demonstrate pre-performance evidence, I will allow students to choose, even if they choose different things within the same group: one group-member might choose to write the script, while the other to draw the storyboard. Students learn better and are more engaged when they are given more choices.
7- Since the MYP requires reflection to be ‘on-going’, I need to incorporate a short reflection exercise for every step of the drama process, not just post-performance. A fellow teacher pointed out that it is best to get students to reflect about what they have just done as opposed to only after their drama performance: so if one student is drawing a storyboard, I can ask them to answer some reflection questions about that specific storyboard like ‘how did the storyboard help you in preparing for your performance?’ and ‘what was the most challenging thing about preparing your storyboard?’

I hope these reflections, and the decisions taken as a result, lead to more engaged students and a much less burnt-out teacher (ME!)…

Image credit: By LaurMG. (Cropped from “File:Frustrated man at a desk.jpg”.) [CC-BY-SA-3.0 (http://creativecommons.org/licenses/by-sa/3.0)%5D, via Wikimedia Commons from Wikimedia Commons

10 things ESL students can do with Evernote on their tablets

My first blogpost for the Oxford University Press ELT Blog about using Evernote in ESL classrooms where students use tablets. The ideas in this blogpost can be applied to all subject areas.

OUPELTGlobal

Tablet in handsMohamed El-Ashiry takes a look at how Evernote can be used in the classroom

Portfolio assessment in the ESL classroom offers many benefits. On the Prince George’s County Public Schools’ website, a portfolio is defined as ‘a purposeful collection of student work that exhibits the student’s efforts, progress, and achievements in one or more areas of the curriculum’. Brown & Hudson (1998) have also described portfolios as a ‘family of assessments’. Some of the benefits of using portfolios, as described by Brown & Hudson (1998) include: (1) focusing student attention on learning processes; and (2) increasing student involvement in the learning processes. I have always been a fan of such ‘alternatives in assessment‘ because of the fact that they focus a lot more on the ‘process of learning’ as opposed to the ‘product of learning’ (Brown & Hudson, 1998).

Now that iPads and tablets are spreading into many…

View original post 808 more words

‘Instant Edmodo How-to’ by Dayna Laur

Edmodo has become very popular as the Learning Management System (LMS) of choice for many schools and teachers around the world. I can not think of any reason why that would not be the case: Edmodo offers a free and user-friendly service. Dayna Laur, a social studies teacher with 14 years of classroom experience, has created a wonderful how-to eBook demonstrating the steps taken to integrate this LMS in the classroom. The eBook, titled ‘Instant Edmodo How-To‘ is targeted at educators and administrators, and is written using very simple language, outlining clear & detailed steps for performing a wide variety of functions using the Edmodo LMS. I would highly recommend reading the eBook for teachers who wish to become more familiar with using Edmodo in their classrooms.

The eBook contains 14 short chapters, each with a different focus. For example, there is a chapter titled ‘Setting up your Profile’ which outlines the steps involved in creating and building your teacher profile on Edmodo. The chapters are also labelled ‘simple’, ‘intermediate’ or ‘advanced’, depending on the level of tech-savviness of the reader, or their level of comfortability with the platform. Each chapter follows the same structure: a short introduction to the Edmodo function or feature, followed by a ‘Getting Ready‘ section to outline prerequisite steps, then a ‘How to do it‘ section listing the steps in a summarized format, followed by a ‘How it works‘ section explaining the steps in more detail. The last part of every chapter has a ‘There’s more‘ section that offers further features or steps for the teacher that would like to try them out.

Dayna Laur has written the eBook using very simple language that I believe is accessible to all educators, regardless of their ICT knowledge or expertise. I also believe her style of writing is very practical and not too technical, and the steps outlined or explained in every chapter follow a very logical sequence. Organizing all chapters using the same structure also helps the reader follow the instructions, and be able to easily identify areas where they might need more reading. Additionally, the eBook is full of screen-shots that help the reader with following the steps outlined in each chapter. The formatting of the eBook is also very appealing to me as a reader: the use of clear sub-headings, the font size, and the appropriate use of ‘bold‘ font and numbered lists. I would definitely recommend Dayna Laur’s ‘Instant Edmodo How-To‘, as I believe it is a useful guide ‘for educators who intend to use Edmodo for instructional support in classrooms or in professional development sessions’.

20130822-170003.jpg

Edmodo + Evernote = my ideal iPad-classroom workflow!

edmodo evernote

I have been teaching in iPad classrooms for nearly 18 months now. During the first few months, the biggest obstacle I faced was creating an efficient workflow between myself and the students. By ‘workflow‘ I am referring to a system that enables the teacher to easily distribute tasks to the students, collect that work back from students, and efficiently give them feedback on their learning. Initially, I would e-mail the students the task sheet, then they would download it and open it in another ‘app’ that allows them to work on it. Once finished, the students would e-mail me the work back. Lots of e-mails got lost, or my e-mail became too hard to organise and manage. Also, students could not e-mail big files like videos they’ve been working on. Additionally, having to e-mail all feedback to students was not fun. Basically, an iPad workflow that relies mostly on e-mail can be a big headache (in my opinion, at least).

Towards the end of 2012, Edmodo introduced a wonderful new feature to their iPad app: the ability to import a document from any iPad app into Edmodo, and hence upload it to your Edmodo Library. This was a great update, and many teachers got excited about it. This meant that now I can use my iPad to upload handouts/task-sheets and then attach them to an ‘assignment‘ post on Edmodo. It also meant that students could download these task-sheets/handouts, work on them in another app, then upload them back onto Edmodo to submit for an ‘assignment’ post. I quickly started using Edmodo in that manner with my year 8 Humanities class. It was great!

All minor tasks and major assessments were assigned through Edmodo, whereby the students would download the task-sheet, work on the assignment in the designated app (Pages, Keynote, iMovie, Notability and Skitch are the most popular in my classroom), then submit their finished product back on Edmodo. Once all assignments are submitted, I then download each student’s submission, mark/grade their work and give them the numerical grade and feedback comment all on Edmodo. The same applies for Edmodo Quizzes: the students can solve them on Edmodo, and view their answers and marks/feedback on Edmodo. In short, Edmodo offers a very efficient, manageable and free workflow system for teachers in an iPad classroom: teachers can easily distribute work to students, collect work back, mark/grade it and give feedback all on the one platform! Below are some annotated screenshots of all the great things Edmodo helps me accomplish in my classroom:

20130809-140359.jpg

20130809-140242.jpg20130809-140314.jpg

20130809-140259.jpg

20130809-140331.jpg

20130809-140418.jpg

However, I quickly realized that I also wanted my students to collect all that work they’re doing into one easily accessible ‘portfolio’, as opposed to it just being on the other apps, and then submitted on Edmodo. This is where Evernote has been a great help. Any student-created Keynote presentations, Pages documents, annotated PDFs, and annotated photos that the students submit on Edmodo, they can also export to Evernote (in their ‘notebook’ which they ‘share’ with me). I always ask my students to export and submit everything in PDF-format as it preserves the formatting of the document. Once I mark the assignment on Edmodo, the students take a screenshot of the feedback comment and the numerical grade. These screenshots are then added into the same note on Evernote where they attached their work in PDF format. An example of this is shown below:

20130809-100700.jpg

Since the students had free accounts on Evernote, I could view everything they added into their ‘Shared Notebook’, but I could not modify or edit any notes. Therefore, by the end of the first term of this year, I decided to trial having a premium account. I created a notebook per student, and shared it with them. Since mine was a premium account, that allowed the both of us to edit and modify notes. We continued to use both Edmodo and Evernote in the same way, however I could now leave my feedback directly in their Evernote notebook for the minor activities finished in class, and use the Edmodo ‘Assignment’ feature for the major assessments. One way by which these shared Evernote notebooks have also been a great help is how I use them to give feedback on quizzes completed on Google Forms. I often create quizzes and tests on Google Forms for my students to complete. The students would access the quiz/test through the URL that I post on Edmodo, and take a screenshot of their filled-in forms before clicking ‘Submit’. I would then open the form responses in  spreadsheet-format, copy each student’s ‘row’ of responses and the row of questions, and paste both into their workbook along with my feedback and mark. Here is an example:

20130809-102440.jpg

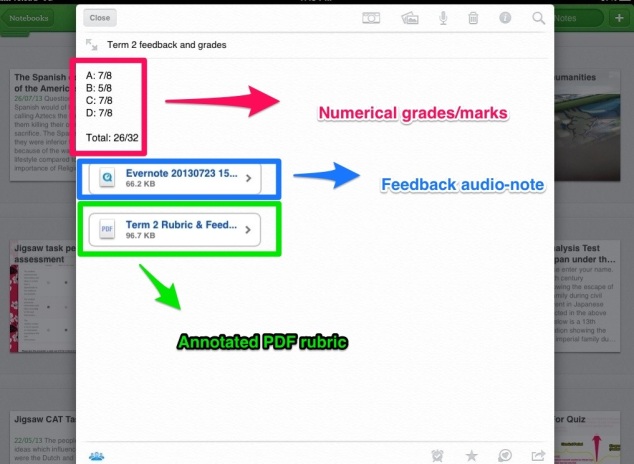
I have also previously written feedback notes in the students’ shared notebooks where I would attach a PDF rubric, and an audio-note along with the numerical marks. I usually do that at the end of every term. Here is an example of that:

20130809-135440.jpg

20130809-141024.jpg

To conclude, Edmodo and Evernote together have really helped me setup an efficient and manageable workflow for my iPad classroom. All tasks can be distributed through Edmodo, downloaded by students from Edmodo into other apps, submitted or ‘turned-in’ through Edmodo, marked/graded on Edmodo, and students can even receive feedback on Edmodo. I would definitely direct any teacher interested in finding out more about it to the ‘Edmodo Help-Centre‘. Furthermore, Evernote has been a great help in allowing the students to collect all this work (along with the feedback received on it) into the one place in the form of a portfolio. Below are some screencasts explaining certain how-tos associated with my workflow, and a screencast giving a tour of my one of my students’ shared notebooks.

My Updated Drama Assessment Framework… And the role of the iPad in it?

untitled

I have written previously about my MYP Drama Assessment Framework, and how I worked hard at creating and developing it. In my opinion, the IB-MYP Arts Assessment Criteria leave a lot of room for teachers to be creative and innovative with how they assess student learning, but also provide a solid structure for assessment. Recently though, there have been changes in my teaching environment that have prompted a change to my assessment practices.

Firstly, I am the only drama teacher at the school, and we have four year levels that have drama timetabled as a compulsory subject. This means I have eight classes a week to plan for, teach and assess. If I am not time-efficient with my lesson-planning and assessment practices, I could very easily be bogged-down and overwhelmed, and not have enough time for my other position-of-responsibility (eLearning leader and head of the school’s iPad program). Secondly, three out of those four year levels have iPads.

Previously, I had a task-based assessment approach. I would assign a task per criteria of assessment, for example: a research and oral presentation task to assess criteria A (knowledge and understanding; a detailed written reflection and evaluation to assess criteria C (reflection and evaluation); a major end-of-unit performance task to assess criteria B (application) [after practicing the skills, techniques and processes needed all term through minor performance tasks]. Finally, I would assess criteria D (personal engagement) through my observations and student self-assessment of certain attitudes and behaviors such as group cooperation, audience skills, commitment and effort, confidence and risk-taking, willingness to perform etc…

While this task-based assessment approach seemed to work for a period of time, I did face some issues/problems with it:

1- students did not put in as much effort in the tasks that were not formally assessed
2- students did not gain a sense of ownership of their ‘developmental workbooks’ or drama portfolios (as more focus was given to the task-booklets and task-components)
3- it was hard finding the time to actually communicate the numerical grades to students and give them detailed feedback on each criteria (as that meant I had to conference at least three times per term with each student, once per criteria. It is difficult for me to find the time to do that.)
4- it seemed unfair that a judgement for each criteria was only tied to one assessment task, as opposed to all work done throughout the semester. For example, it did not seem right at first to only assess one written reflection and evaluation for Criteria C (reflection and evaluation) even though the students reflect and evaluate all throughout the term.

Therefore, I decided to move to a more portfolio-based approach. Instead of linking each criteria of assessment to a specific task, I decided to trial an approach where each criteria is linked to a ‘portfolio of artifacts’ that demonstrate these specific competencies, abilities and skills. The students would be given the modified MYP rubrics at the beginning of the course, along with a portfolio self-assessment checklist that covers all strands of each criteria. At the beginning of the course, as opposed to the beginning of each task, I would talk to the students about the assessment criteria and give them examples of artifacts they can add to their portfolio to show evidence for every criteria. I would also constantly remind them of artifacts they need to put in their portfolio as we move between the learning activities. Towards the end of each unit of work, I would then conference with each student and together determine a numerical grade for each criterion based on the evidence in their portfolio.

For the iPad classes, I decided I will use Evernote as the platform for their drama portfolios. Evernote is great because it allows adding photos, audio notes, checklists, text and hyperlinks, which covers pretty much everything (video can be hyperlinked into the portfolio, as Evernote does not as yet allow embedding video into a note through the iPad). The students will create an Evernote workbook and share it with me. Here is the structure I have thought of so far:

1- students create one note in which they attach the drama booklet, which will have the rules for the drama classroom, the drama contract, the rubrics for the assessment criteria, the portfolio self-assessment checklist, and some basic info about certain aspects of the drama classroom. The drama booklet will also have three templates that we use often in the drama classroom: the reflection help-sheet from which students write their four-sentence reflections at the end of every lesson, the peer-evaluation template which students use to evaluate their peers’ performances, and the self-evaluation template which they use to write an evaluation of their own performances. This drama booklet will be a reference that they will refer to frequently.

2- students create three separate notes, each titled: ‘Four-Sentence Reflection – Criteria C (Reflection and Evaluation)‘, ‘Peer-Evaluation – Criteria A (Knowledge and Understanding)‘ and ‘Self-Evaluation – Criteria C (Reflection and Evaluation)‘ respectively. These three written tasks are very ‘routine’ in the drama classroom, and so I have created Google Forms for them. The students fill-in the Google Form for whichever one they are doing, and will be asked to take a screenshot of the form before they submit it so as to keep in their drama portfolio in the relevant note. Students will also add screenshots of self-assessment checklists and peer-assessment checklists to the relevant note, whenever asked to complete one.

3- students add evidence of research about the art form to a note titled ‘Criteria A – Knowledge and Understanding’, where they can add hyperlinks, or annotated screenshots, or answers to comprehension questions. Peer evaluations are also assessed as part of Criteria A.

4- students add evidence for every step of the drama process: planning, preparing, rehearsing, performing, reflecting & evaluating, and this evidence will be used to assess Criteria B – Application. This criteria of assessment focuses more on the skills, techniques and processes used to create drama, and so students can add story-maps or brainstorms, or written/annotated scripts, or storyboards, or sketches of the set/performance space, or rehearsal logs, or group-work logs, or photos/videos of rehearsals and performance, or anything that can demonstrate evidence of the relevant step of the drama process. For every performance activity that we do in class, there will be a focus on one step of the drama process more than the others. For example, for a radio-commercials performance task [in the year 6 Radio Drama unit-of-work], the focus might be on rehearsal and so the students must attach evidence of rehearsal, while for a radio-interviews performance task the focus might be on planning/preparation and so students can attach a script for the interview or a list of questions and answers. The reason I will have only one focus per learning activity is to keep the written component to a level that does not disengage the students who just want to get up and perform, but also to cater to those students who excel in the written components more than the performance aspect of the subjects.

I am really excited about this new assessment framework, and I can not wait to trial it for this coming semester. I would love to hear any feedback or suggestions from readers.

Creating digital portfolios on iPads using Google Sites: it’s doable!

This year the eLearning leaders at our school were asked to find a “cost-effective” way to allow students to create digital portfolios (ePortfolios) that can be exhibited during the school’s end-of-year exhibition. Evernote was definitely considered as an option, but the cost of the premium account was a deterrent. Additionally, we wanted something that can easily be viewed on the Internet to help with the portfolio assessment process and to share with parents.

I have always been a big fan of Google Tools, and I’m an even bigger fan of Google Sites. However, the Google Sites interface is not the most iPad-friendly, and uploading attachments requires a slightly longer process and a lot of patience. But, it’s feasible!

I noticed that on Twitter, the whole discussion about ePortfolios for iPads does not mention Google Sites at all. Surely, there are more iPad-friendly tools like Evernote, Three Rings and Easy Portfolio. But our school is a Google school, and so all our staff and students have Google accounts, that’s the first reason we decided to choose Google Sites. Secondly, building an ePortfolio on Google Sites will not follow the same process on the iPad as it would on a laptop/desktop computer, as there is no ‘hard disk’ on the iPad from which you can directly upload the artifacts to be exhibited. That presents challenges, but I still insist that it is doable, so long as teachers & students are patient and keep an open mind.

The combination of apps our students use to build those portfolios includes: Pages, Keynote, ShowMe, iMovie, Notability, Google Drive iPad app, and Safari. Any document the students have on Keynote or Pages can be uploaded directly on Google Drive through the iPad app, and I ask them to ‘open in Google Drive’ as a PDF (because it preserves formatting). If the students have a video on iMovie, it can be exported to the Camera Roll and then uploaded on Google Drive through the iPad app, the same with any photos in their Camera Roll. If students have work on ShowMe, it can be uploaded onto their ShowMe.com profile, and then the ShowMe can be ’embedded’ directly into the Google Site by using the embed code. If students have any annotated PDFs on Notability, they can be similarly exported to the Google Drive iPad app. I think that pretty much covers all student work!

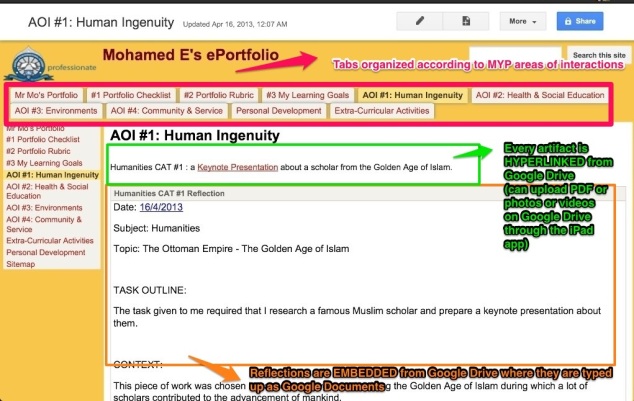
Basically, I tell my students to upload one artifact at a time, and then create a Google Document in which they will write up their reflection on that artifact. Once all artifacts are uploaded, and the associated reflections are written up, students then must change the sharing setting of these artifacts and reflections to ‘anyone with the link…’ and ‘can view’. Each artifact is then hyperlinked in the Google Sites ePortfolio, and the associated reflection is embedded right under it.

20130505-104448.jpg

Here are the detailed written steps of this process, followed by some video how-tos:

Detailed Written Steps:
1- Create a folder in Google Drive (through the iPad app) called ‘Portfolio Items’ or ‘Portfolio Artefacts and Reflections’.

2- Choose the artefact you want to upload, whether it is a Pages document or a Keynote presentation and ‘Open in Google Drive’ as a PDF. You can also directly upload pictures or videos from your Camera Roll onto the Google Drive iPad app.

3- Once an artefact is uploaded onto Google Drive, rename it so you can easily identify it later, and then create a new Google Document where you will write up the reflection associated with that artefact. Give that Google Document a name similar to the artefact but with the words ‘reflection on…’ at the beginning.

4- Repeat steps 2 & 3 for all other artefacts you wish to upload and reflections for each artefact.

5- Once all artefacts are uploaded and each artefact has its own associated reflection, log onto Google Drive through Safari.

6- Select the artefacts and associated reflections and change their visibility (through the ‘sharing’ button) to ‘anyone with the link…’ and ‘can view’.

7- Open the artefact you want to add to your Portfolio from Google Drive and copy the ‘hyperlink’ to it.

8- Go to your ePortfolio on Google Sites and click ‘edit page’ and type a sentence that explains what the artefact is.

9- Select a part of that sentence that you want to ‘hyperlink’ and click the ‘link’ button at the edit bar, then paste the link to the artefact from Google Drive as a ‘web address’ Remember to select ‘Open in a new window’.

10- After you have hyperlinked the artefact, the next step is to embed the associated reflection. Click ‘insert’ at the top of your Google Site and select ‘Document’ from the menu of options. You will be taken to your Google Drive Documents and select the required document.

I published these steps and the videos on this Google Site for the staff and students’ reference: iPad Portfolio How-tos

I would like to clarify that I am not arguing that this is the ‘best’ way of creating digital portfolios on iPads, or that it is more superior to the other options like Evernote, Three Rings or Easy Portfolios. I am merely arguing that schools who might be in similar circumstances to our school can choose this as an option, and that while the process on the iPad is not as intuitive and the interface is not the most iPad-friendly one, it’s still DOABLE!

The year 8s & 9s will have a very melodramatic term!

Last term, the year 8s and 9s did Commedia Dell’Arte. This blog follows that specific group’s journey because they are the group with whom I trial my new units of work, as they were the first group in the school to take drama as a subject with a curriculum created by myself. This blog allows me to document their learning progress (and my teaching progress) and also reflect on my lessons, units and tasks. Last term’s unit of work on Commedia Dell’Arte was a huge success, and the students enjoyed it a lot.

When I was planning the unit of work for this term, I had lots of different ideas. I was interested in exploring horror as a genre, directing skills, and script-writing as a process. However, I decided to focus on the process by which the director and actors stage a play. In all other previous units of work, the students would write up their own scripts and performances. So I decided to give them a new experience: staging a play based on a script written by someone else. This will introduce new steps to the process of character-analysis and character-development.

I started searching for simple, cheap/royalty-free scripts online. At first, it didn’t really matter what the genre was. But over time, I thought maybe melodrama as a genre would flow naturally from Commedia Dell’Arte (which they did last term) and Slapstick Comedy (which they did the term before last). In both the Commedia and Slapstick units of work, students were encouraged to exaggerate body language and actions, and explore status relationships. In melodrama, exaggerated actions and dialogue is a key feature, and the students are exposed to different character relationships: villain, victim, hero, sidekick. Also, melodrama is a genre that we can all relate to because we come across it very often on TV and in movies!

I found a couple of Melodrama scripts online that were simple, fun and easy to perform: ‘Love, Sick and Montezuma’s Gold’ and ‘Truth and Consequences’, both by Daris Howard (I purchased them from Amazon for about 99cents each!). Since the plays are only performed in class for educational purposes, it falls under fair use of copyrighted material. I decided to select small excerpts from each play, get the students to use these excerpts to analyze and develop character, then write up a beginning for that scene-excerpt, and an ending. The students will then create masks for their characters, rehearse their scenes and perform in front of the class. The audience will provide feedback for the performers, and then each performer will write up a detailed reflection and evaluation. This is a lengthy assessment task that will last about 7-8 weeks, and will be used to assess all four MYP arts criteria.

The MYP Area of Interaction for this unit of work is ‘Human Ingenuity’ because it follows the highly creative process by which a performance is made alive from a written script. The Significant Concept is: The process is just as important as the product, and the MYP Unit Question is: How does the quality of the process affect the quality of the final product? I decided to focus a lot on the ‘process’ as many of my students tend to pay a lot of attention to the final performance that they neglect a big part of the process which is the documentation of written evidence (in their rehearsal logs, for example) and the ongoing reflection and evaluation. Therefore, this unit of work was created to give students the new experience of performing a script written by someone else, to expose students to a new genre which is melodrama, and to highlight the importance of significant steps in the process leading up to the performance that students tended to neglect in the past.

During this week’s lesson, the students were given this student handout to introduce them to the unit of work and the weekly plan, and also to encourage them to set three personal learning goals for this term. After that, I used this fantastic one-page script-excerpt to introduce the students to melodrama and brainstorm the features/elements of melodrama (I found this script-excerpt as a part of a year 7 Melodrama unit of work on this website). We read the script-excerpt once together, then I asked some students to dramatize it in front of the class. After the dramatization, we had a quick brainstorm on the whiteboard to highlight the features of melodrama as demonstrated by this script-excerpt and other melodramas that the students can identify from TV shows and movies.

Image credit: CC-BY-SA-3.0 (http://creativecommons.org/licenses/by-sa/3.0/)%5D, via Wikimedia Commons

World Theatre Day!

March 27th is World Theatre Day (WTD). This year, I received a message from a teacher from the United States on Twitter, Nick Cusumano. He approached a number of drama teachers in the Twitterverse, and suggested we do a collaborative video showing our students reading ‘All The World’s A Stage’ monologue from Shakespeare’s ‘As You Like It’.

We all got super-pumped and excited and got right on it. I asked five of my drama club students to read different parts of the monologue: Attila, Hana, Hameed, Amine and Furkan! I am very proud of them and their performances in the video! Enjoy 🙂