To sum up this unit of work, and to allow for summative assessment of MYP Criterion B (Application), the class will have the opportunity to create their own horror radio plays (as inspired by Orson Welles’ War of the Worlds). The lesson’s learning objective is to apply the skills, techniques and processes used to create a radio drama performance. This task will span over two double-periods (one double-period per week).
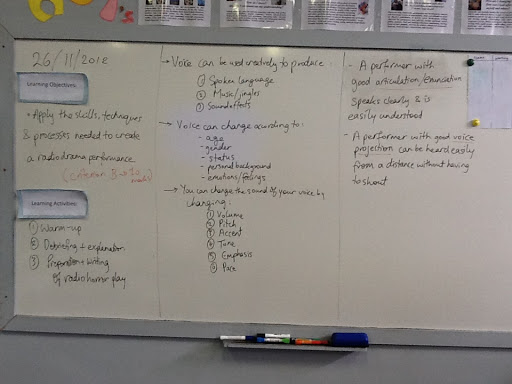
To start off the lesson, we did a quick ‘one-sentence story with sound-effects’ warmup, where students sit in a circle and each of them contributes a sentence to build a horror story. I asked students to use their voices and their bodies to create sound effects and background music to set the mood/scene and to accompany each sentence contributed to the story. We then debriefed on the warmup and quickly reviewed the theoretical material we learned throughout this unit of work (which is all written on this snapshot of the whiteboard).
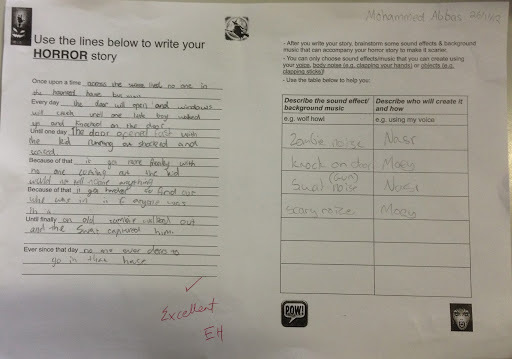
The students were then asked to move into groups of 3-4 students and they had to use this story outline and the sound-effects table to brainstorm and prepare their horror radio play. We read over the task sheet as a class and discussed the rubric and task expectations. The students then spent the rest of the double-period writing their horror stories and deciding on the sound effects and background music that will accompany the radio play. You can find snapshots of the students’ work below.
This task can also be adapted to use in an English/ESL class after exploring radio plays and story structures. Next week, the students will rehearse their radio plays, and then perform it in front of their classmates to receive feedback, then reflect on and evaluate their performances. It will be a very busy lesson. Stay tuned!
I write a lot about the iPad. This is because we’re an iPad school and I’m an eLearning leader. However, luckily, we’re also a Google school! Our school has signed up for the Google education suite years ago, and every staff member and student has a gmail account. Thank the heavens!
Google Apps for Education offer a very wide range of apps that can make the learning process more engaging, meaningful and interactive. I am a Google-addict and I encourage all teachers to integrate each of these Google products in their classroom, one way or another!
1- Google Docs: Wikipedia defines Google Docs as “a free, Web-based office suite and data storage service offered by Google within its Google Drive service. It allows users to create and edit documents online while collaborating in real-time with other users”. The applications of this service in the classroom are endless:
essay-writing tasks: if a student is asked to write an essay, they can set up a Google Document and share it with the teacher. The teacher can give feedback in real-time during the drafting process, and the student can invite another classmate to give peer feedback. This way of setting up the task emphasizes the PROCESS of writing the essay, and not just the final PRODUCT.
student presentations: if a group of students have a presentation together, they can set up a Google Presentation and collaborate in real-time to create it.
2- Google Drive: is Google’s file storage and synchronization service. Google Docs is now a part of Google Drive. This service allows sharing all sorts of files with the students, whether they are worksheets or handouts or templates etc… Students can also upload files to share with the teacher such as completed work to be graded/marked etc…
3- YouTube: is a video-sharing website that was recently acquired by Google. There are many teachers who bring YouTube videos into their classroom, whether to help explain a difficult concept or to illustrate with examples or to spark a debate. However, I believe 21st century teachers should now be pushing students to become content providers, and not just content recipients. A teacher can easily set up a class YouTube channel for students to upload the videos they created, whether they are filmed drama performances, or screencasts about educational topics. YouTube also offers a range of security options, so videos can be set to either public, or unlisted or private, and thus the students’ safety is not compromised. Here is a link explaining the many ways YouTube can be used in the classroom.
4- Google Sites: as defined by Wikipedia, Google Sites “is a structured wiki– and web page-creation tool offered by Google as part of the Google Apps Productivity suite”. A ‘wiki’ is a collaborative website in which users can add, edit or delete content via a web browser. There are many ways a teacher can use wikis in the classroom:
Student portfolios: a very common way I have observed of using Google Sites in the classroom. The teacher would set up a Google Site and give each student a page name where they upload and embed evidence of the learning process. Students can add video (embedded from YouTube), audio, pictures, text, hyperlinks and documents/files (embedded from Google Drive). Alternatively, each student could create their own Google Site as their portfolio and have a page for each learning objective for which they have to demonstrate evidence of learning.
Revision notes: I used a wiki last year to allow the students to collaborate in preparing revision notes for the final exam. Each group of students were given a chapter to summarise and collect/create revision material for, and a corresponding page on the class revision wiki.
Resources website: A teacher can set up a Google Site for a specific unit of work or theme that the students are interested in and the class can add educational content to build an educational resources website about that topic/unit/theme.
5- Google Blogger: is Google’s blog-publishing service. A ‘blog’ is essentially a journal of entries (or ‘posts’) that are displayed from most to least recent. Blogs can be used for discussions, posting information for parents and/or students, student portfolios, collaborative projects and reflective journals. The teacher would have to set up the blogs for either individual students or groups of students, since Blogger has a minimum age requirement for setting up blogs. A blog can also be set up if the teacher wants to flip the classroom. I would normally post a video along with a discussion question and an embedded Google Form to help with my formative assessment and to check students’ understanding.
While these are not the only products Google offers as part of its educational apps, these are the ones that I love the most. These apps can be seamlessly integrated and combined together to create a classroom environment that encourages creation, collaboration and communication, while also allowing for the collection and collation of evidence of the learning process.
This week, the ‘theatre companies’ (the fancy name I use for my drama groups) finalised their brainstorms and started writing their scripts and creating their storyboards. The script-writing process was mainly driven by each group’s ‘writer’, while the story-boarding was mainly driven by the group’s ‘director’. The year 7 classes had to do this on their iPads and attach evidence to their group portfolio on Evernote. The year 8 classes (who do not have iPads) were each given a group folder to use as their portfolio for the task. The lesson’s learning objective is to ‘apply the skills, techniques and processes used to create slapstick comedy performances’.
The lesson’s warmup was a game I found on The Drama Notebook called ‘Queen of Hearts’. This game is designed to get students to think about status, as each student is assigned a card from a deck of cards. Each card represents a different character in a medieval royal court, and the higher the card the higher the status of the character. The students then mill about the room, walking and relating to others in character. The class then had a quick debriefing session about the warmup and we related it to the use of status relationships in slapstick comedy to add to the humour, either by overly exaggerating those relationships or challenging them. We also talked about other ways to create character in slapstick comedy, such as creating dominant negative personality traits for each character and designing bizarre over-the-top costumes.
To start the second step of the drama process, which is preparing the script and storyboard, the students used this template which I adapted from a worksheet I stumbled into by accident through a Google search of ‘drama worksheets’ (the Internet is MY BEST FRIEND). The students had to use what we have learned about slapstick comedy so far in their script-writing process (e.g. they must incorporate some slapstick techniques like the trip, slip, collide, double-take, stuck, and lazzi; they must use slow-motion to add dramatic effect to these techniques; and they were also encouraged to use status, personality traits and costumes to add comic potential to their characters). Here are snapshots of one group’s script and storyboard:
Next week, we move into the third step of the drama process, which is ‘to rehearse’. The students will be using a template for blocking and rehearsing, and they will also be using their iPods/iPads/smart-phones to document their rehearsals and reflect on their acting to refine and polish their performances. Stay tuned!
The next lesson in this unit of work is ‘radio interviews’. The learning objectives for this lesson are: 1) to develop better voice projection 2) to create a radio interview
The warmup chosen was a voice-projection exercise where the students form pairs and then line up facing each other. The pairs then start a conversation, until they are instructed to move three feet away from each other, and continue the conversation. After about 30 seconds, they move another three feet away from each other, and so on. After the warmup, we debriefed as a class to explore the benefits of this warmup, and the skills it allows us to practice, and how it linked to voice projection.
After the debriefing, I explained the new theoretical material for the lesson. I explained what voice projection is and how performers can use certain strategies to improve their voice projection. The students were told that they will have an opportunity to practice those strategies through a simple performance exercise: radio interviews.
The task required the students to form groups of 3-4 members, pick a celebrity/cartoon-character to interview and write up five questions and answers. Each group had to have 1 or 2 radio hosts asking the questions, and the remaining group members play the chosen character/characters or celebrity/celebrities who answer the questions (in character). Each performance also had to include a jingle for the radio station, created by the students’ voices.
The students were told that for this performance the audience members will sit at the very back end of the room (as far away from the performance space as possible), and so the performers really had to project their voice if they want to be heard.
The task was very engaging for the students. One group interviewed Spongebob Squarepants, and another interviewed Bart Simpson. Most of the boys decided to interview famous sports-stars I haven’t even heard of (sports isn’t really my strong point)! The audience members gave the performers positive comments and useful suggestions after every performance, because I like to allow my students to step into the “critic’s shoes”. To wrap up the lesson, the students had to write an ‘exit slip‘ explaining what they learned today and what they found enjoyable.
Overall, the lesson was a success, the students created some fantastic performances, and most groups projected their voice well enough! This lesson can also be adapted and used in any subject: interviewing a scientist in Science, a mathematician in Maths, a book author in English/ESL/LOTE etc…
Here is a radio interview created by a group of girls who decided to interview Bart Simpson. There is also a snapshot of the whiteboard, and some of the exit slips!
I bought my iPad about eighteen months ago. I have said it before, and will say it again: it has changed my life! As an eLearning leader, one of the most common complaints I receive from staff is that “it is really hard to stay organized with the iPad! Everything is all over the place!” I could not disagree more. I have developed an arsenal of strategies and apps to help me stay organized (in addition to the standard Calendar, Mail and Reminders apps):
1- Curriculum-design (unit-planning): I use Pages to help me stay on top of curriculum design. Once I import into Pages the blank template for the MYP Unit Planner, I just reproduce copies of it for every unit of work I need to plan. I also organize my Pages app into folders according to subject or year level or function.
2- Lesson-planning: I use Evernote to plan my lessons. I have set-up a notebook called ‘Work’ (not a very creative name I might add) and I have a ‘note’ in this notebook for every class. Since my drama lessons are weekly double-periods per class, I just write the week number and then write the learning objectives, learning activities, resources and assessment activities for the lesson/week. By the end of the term/semester, I end up having a journal of lesson-plans.
3- Documentation: I use Evernote to document evidence from my lessons. At the end of every class, I take a quick snapshot of the whiteboard and add it to my lesson-planning note for the class. If the students did brainstorms on poster paper, I would take photos and add them to the note as well. If students used some sort of Web 2.0 tool during the lesson, I would take screenshots of what they produced (for example: results from a Google Form, or a typewith.me document etc…) Other things that I can often document are photos of rehearsals, or short audio recordings of anecdotes from the lesson etc…
4- Reflection: I add a very short reflection to my Evernote lesson-planning after every lesson. The reflection I write highlights what we managed to finish during that lesson, what I need to keep in mind for the next lesson, what sort of behavior-infractions I observed and how I responded to them, and what sort of positive behaviors I have observed and praised/rewarded. Sometimes, when my reflection is too long to type, I just record it as an audio note through Evernote.
5- Attendance and Assessment records: I use Numbers to keep my attendance and assessment records. One thing I love about Numbers is the many different sorts of cell-formats you can have: checkboxes, pop-up menus, star-ratings, sliders, steppers etc… At the beginning of the year, I design a template that will include all the assessment columns with the appropriate format, as well as an attendance sheet. Then I would reproduce copies of that template for as many classes as I have and add the students’ names to the template. Once student names are added, you can view every student’s ‘form’ as just one card of all their assessment and attendance records, which can be very useful for quick data input of formative assessments in class while observing students. It’s fantastic!
6- File-sharing and printing: many teachers initially complained that the iPad does not have a USB port. I recommend Dropbox as a very easy solution to this. Just set it up, for free, on your desktop computer or laptop, and copy/paste all of the files you need into Dropbox. Then you can access them from your Dropbox iPad app. Dropbox also allows setting up shared folders between teachers and students (to exchange handouts/worksheets or submitting student work), or between collaborating teachers (to share resources). Read this post about Dropbox and how to make the most out of it. Many teachers also complained about the difficulty of printing from the iPad, especially because our school wifi network does not allow AirPrint. Initially, I used to remind them of the need to cut down on paper consumption and advise them to e-mail whatever they really need to print to their e-mail address and then print it from a laptop/computer. Now, with the iOS 6 update, it’s easy to just get a document from Pages/Numbers/Keynote and then open it in another app, e.g. Dropbox. I often export the document as a PDF to Dropbox, which then pops up directly on my laptop so I can print it from there.
7- Marking and grading: when the students send me work, I often ask to receive it as a PDF (most apps allow exporting as PDFs). Then I use Notability to add my annotations, comments and grade/mark their work. Notability also allows recording audio onto the document, which is a feature I use to give oral feedback on the work for every student.
To conclude, I must mention (and it goes without saying) that this list is not exhaustive and these apps are not the only ones suitable for these tasks. I am merely sharing what works for me and how I personally use my iPad to stay on top of lesson-planning, curriculum-design, attendance and assessment record-keeping, file-sharing, marking and grading, as well as reflecting on and documenting evidence from my lessons. Please feel free to recommend other apps and suggest different uses by leaving a comment below! Happy iOrganizing!
So, over the past few weeks, the year 7s and year 8s were exploring humor in general and then moved on to defining slapstick comedy. This week’s lesson was an introduction to the slapstick techniques that they can incorporate in their performance: the trip, the slip, the collide, the stuck, the double-take, and lazzi (comic accidents). We discussed each of these techniques and we got a chance to apply them. We also highlighted the importance of slow motion to add dramatic effect and for the actors to stay safe.
The warm-up for the lesson was a One-Sentence-Story with the title “The Worst Day of My Life”. We all sat in a circle and every student had to add one sentence to the story. This warm-up was chosen to get them to think about accidents and mishaps, which is what slapstick is mostly about, and as a preparation for the assessment task to follow. The students then moved into groups and were told that we will start the first step of the drama process this week to prepare a slapstick comedy performance titled “The Worst Day of My Life”. They had to decide on who is going to be the group’s writer and who will be the director for this performance. The students are aware that the first step of the drama process is to brainstorm, and I used this story-map graphic organizer from Education Oasis to get them to think about their performance. Here is a snap-shot of one of the groups’ story-maps.
During the course of the coming few weeks we will move into the remaining steps of the drama process, which is to prepare a script and a storyboard for their performance, followed by the third step, to rehearse and polish their performance, then to perform in front of an audience and receive feedback, then to reflect & evaluate. Each of these steps will require certain evidence being documented in the group’s portfolio for this task. The year 7 students are also doing the same task but they are using their iPads to prepare their portfolio.
Stay tuned for next week’s lesson, where we move on to scripting and story-boarding the performance (some groups already started this step because they were so excited)! We will also focus on the role of costumes, personality traits, and status in slapstick comedy to help the students create slapstick characters when writing up their performances!
Today’s year 6 Drama lesson was wholly devoted to articulation and enunciation. As part of the unit of work on ‘Radio Drama’, one of the learning objectives is to “develop better articulation and enunciation”. This lesson comes after a poetry theatre lesson where students experimented with voice as a tool to create different characters. Before that, the students had also created their own radio commercials, which was an attempt to explore the creative potential of the voice.
Today’s lesson had a bit of a twist to it, literally! The whole lesson was built around tongue twisters, which are often used to develop better articulation and enunciation. The lesson started with a tongue-twister relay as the warm-up: students form teams of five, and then they are all given the same tongue-twister, where each member has to say it three times without mumbling or stuttering. If any team member stutters or mumbles, then the whole relay is reset back from the first player. After a few rounds of this warm-up, we debriefed as a class and discussed the uses of tongue-twisters and how they help us speak clearly and improve our enunciation. I also explained what enunciation and articulation mean, and why they are important in radio drama, which was also written on the whiteboard (snapshot below).
The performance part of the lesson was based on these Tongue Twister poems which I found online. The students formed groups of 3-4 members and were each given a different tongue-twister poem. They were told that the task is to dramatize this poem as much as they can, yet still deliver it clearly to the audience. They were encouraged to add music or sound effects, as long as it was all created by their voices (not using iPads or iPods).
The students were given about 15 minutes to prepare and rehearse, then they all performed their tongue-twister poem to the audience, while being recorded by the iPad (to facilitate their reflection and evaluation after the performance). After every performance, each group was given positive comments and useful suggestions from their peers. The last part of the lesson was time set aside for writing their four-sentence reflection using their reflection help-sheet, and after listening to their own performances to help them identify their strengths and weaknesses.
The lesson was quite entertaining, and it was very cool what they all came up with. I believe this lesson can also be used in an English/ESL/LOTE classroom to develop better enunciation and clarity of speech.
Differentiated learning is at the heart of my teaching philosophy. I believe teachers need to make a conscious effort to embrace all learning styles in their instruction, and to embed these learning styles in their assessments. I also believe the iPad makes doing so much easier, as it has for me. The iPad, and its enormous range of educational apps, offer multiple ways of teaching. Additionally, a very wide range of creation-apps means that students can create and produce content that suits and caters for their preferred learning style.
Differentiation needs to be equally embedded in assessment as it is in teaching. Students should be given opportunities to demonstrate their learning in a manner that suits their preferred learning style. Giving students tests under exam conditions is not always the ideal way for many students to demonstrate what they have learned. I have argued in an earlier post that teachers need to make more use of alternative assessments and achieve more of a balance between assessments for learning and assessments of learning (which appears to be a lot more prevalent to me). While my main timetabled subject is Drama, I also teach Humanities, English, ESL and the Business Studies. I would like to see more of the assessment practices used in drama in those non-drama classrooms. I have been making an effort to do so myself in my non-drama classes.
I am a big fan of portfolio assessment. The iPad allows the documentation of learning all throughout the learning process, not just the final product, which is exactly what portfolio assessment is about. In the drama classroom, my year 7 students can use their iPads in every stage of the drama process:
Planning : a huge variety of brainstorming and mind-mapping apps can be found in the App Store. My favourites are: iBrainstorm and Idea Sketch. Students collaborate in their groups called ‘theatre companies’ (which work very well for the people-smart/interpersonal learner) to brainstorm for their performance based on the prompt assigned or the task given, and then take screen-shots of their brainstorms to share so that each can document evidence of brainstorming in their portfolios (I use shared notebooks with every student through Evernote). This works perfectly for the more visual learners. However, some learners prefer to talk during their brainstorms and keep recorded audio clips on Evernote as evidence of brainstorming, or hyperlinks to an uploaded ShowMe where they screencast their brainstorms (works well for auditory/aural learners).
Preparing: the second stage of the drama process requires students to transform their ideas into writing a script or preparing a storyboard. Students can use Evernote or Pages for writing (if they are more word-smart, verbal or linguistic learners), or Storyboards app for preparing a storyboard (if they are more picture-smart or visual learners). ShowMe can also be used to prepare storyboards where students sketch-and-talk how they will go about their performance. Again, whatever is prepared has to be documented in their Evernote portfolio, whether as a note for their script or an embedded screen-shot for their storyboard, or hyperlink for their ShowMe.
Rehearsing: I believe the iPad has been most helpful in this stage. Students use the camera to take pictures during their rehearsals or to keep video footage. Watching video footage of their rehearsal allows them to see themselves (very useful for the visual learner) and facilitate reflection and evaluation (for the intrapersonal and reflective learner), so that they can brush up their performances before delivering them to a wider audience. Pictures can easily be embedded into their Evernote portfolio. If videos are kept, the students can upload them onto the class YouTube channel and add hyperlinks to their portfolios. Students can also choose to fill-in this Rehearsal Log and either screen-shot it or attach it to a note in their portfolio.
Performing: the students are expected to document their performances through taking video footage. These videos are taken primarily to facilitate student reflection, self-assessment and self-evaluation. Students also use these videos to evaluate their peers. Again, those videos can be uploaded on the class YouTube channel and hyperlinked in their portfolios.
Reflecting & Evaluating: students are expected to keep record of their reflections, either in written format (for the word-smart/verbal learner), or oral format (for the auditory/aural learner). Written reflections can automatically be typed in Evernote, and oral reflections can be recorded and embedded right through the Evernote iPad app. I also make sure there is some sort of structure or framework for reflection, so my students use the reflection help-sheet as their guide. Additionally there are many templates that I use for reflection and evaluation and I can easily share them with my classes through Evernote. The students can then take a screen-shot of the template and write over it in Skitch, which can then be embedded into their Evernote portfolio.
Additionally, there are multiple opportunities for students to create media-rich and authentic content in the classroom, whether they use iMovie to create trailers for their performances throughout the semester, or audio podcasts of tips for actors/directors/writers, or screencasts of theoretical material to teach other students and document their learning, or sound effects and background music using GarageBand, or photo collages of their group work, rehearsals and performances using iPhoto or FrameMagic.
While I have described my portfolio assessment practices in the drama classroom, along with my attempts to differentiate to cater for all learning styles, I believe such practices can be replicated in any other subject area. Whether it is video footage of experiments in Science class, audio podcasts of book reviews in English class, screencast videos to explain complex mathematical theories in Maths class, I believe the iPad can be used to differentiate assessment practices. All that needs to be done is to view learning more as a process, and not just the final product, then find ways to document evidence of as many steps of that process as possible.
To conclude, I believe the iPad can be used to teach across all levels of the Bloom’s Taxonomy, with a very wide range of opportunities to create (the highest level of thinking on the revised Bloom’s Taxonomy). Additionally, it can be used to differentiate teaching to cater for all learning styles. However, it is not enough to just use it to differentiate our teaching, our assessment practices need to also be differentiated and the iPad can facilitate this differentiation.
Update 25/05/2013
I delivered a presentation at the ICTEV 2013 conference about this, you can find the PowerPoint I used here.
As part of our unit of work on ‘Radio Drama’, there is a lesson devoted wholly to poetry theatre. This lesson follows the ‘Radio Commercials’ assessment task, which the students successfully completed last week. The learning objective of the lesson is to ‘apply characterization skills to voice’ and discover the many things voice can tell us about a character: age, gender, status, cultural background and feelings/emotions.
The lesson starts with a warm-up I got from The Drama Notebook called ‘color your nursery rhyme’. As a class, we select a nursery rhyme and practice saying it in different ways: angrily, like a crying baby, like an opera singer, happily etc…
The class then debriefs about the warm-up and reflects on the skills practiced, then we link it to and discuss the theoretical part of the lesson (written on the whiteboard, here’s a snapshot of it).
After the debriefing and the discussion, the students are divided into groups and all given the same poem to recite. However, they are each given a picture of a different character and they have to recite the poem using that character’s voice (or their perception of it). I gave them pictures of an angry-looking middle-aged man, a very sophisticated high-class rich middle-aged woman, a frustrated and sad-looking young female child, a grumpy old grandma, and a bored-looking teenager sitting in class.
The poem I chose is ‘Homework I Love You’ by Kenn Nesbitt. The groups were each given 15 minutes to discuss what sort of voice their character would have, and to rehearse delivering the poem using that voice. Then we set-up a curtain and the students had to perform behind it, with the picture of the character pinned to the curtain. After every performance, the audience were asked to act like critics and give either positive comments or useful suggestions for improvement.
To conclude the lesson, the students spent about fifteen minutes writing in their drama journal (which is more like a ‘portfolio’) using the reflection help-sheet. Here is a snapshot of one student’s four-sentence reflection.
I believe the lesson went rather well. Looking back at it, maybe I could have used different poems for every group, however I chose the same poem to show the class how the same piece of text can be read and dramatized differently using voice. I could have also given the groups choices about what character/s they want to read as, and each group member could have a different voice.
I believe this lesson could also be used in an English and ESL classroom to get students to think about speaking and how vocal variety affects the audience’s attention to your speech.
Here is a nice video created by students who decided to rap their poem, this was all prepared using GarageBand and iMovie!