So, it’s the end of my first trimester at St Timothy’s School this coming Friday (Nov. 18th 2016)! And what a trimester it has been…
As part of our employment agreement, we have to submit a “self-evaluation identifying three strengths, three areas for improvement, and an action plan to support our professional development”, so here goes!
Three strengths:
1- My rapport with the students and the ability to establish relationships with them: I love the students at this school, and I feel like I have quickly built a solid connection with them all…
2- My use of the classroom facilities and resources: I have quickly embraced the new work space, I love that I have a massive National Geographic World Map in my classroom (picture below):
This map allows me to integrate lots of World Geography in my teaching of World History and makes it much easier to connect both disciplines (which are absolutely interdependent). My use of the technological facilities is also another one of my strengths: I enjoy using the EnoBoard and EasiTeach to create notes for my students to access after class or if they’re absent, as well as of course my expertise in integrating iPads in the classroom (all students have iPads = woohoo)!
3- My embrace of the community duties and responsibilities: I believe I have a very positive attitude and I have readily embraced the extra duties that come with working at a boarding school like roaming duty on certain weekends, organizing activities like dance classes for students, putting on performances for International Festival etc…
Three areas for improvement:
1- Using more differentiated teaching methods: I believe I do an ‘ok’ job when it comes to differentiating my instruction. However, now that the trimester is over and I have gotten to know my students better and assessed a lot of their work, I’m starting to see more differences in learning styles and learning needs and I need to reflect on and adjust my instruction accordingly.
2- Providing more support for my advisory group: I believe I can sometimes get bogged down with all the grading, lesson-planning etc, and forget to check up on my advisory group members, though I enjoy being their adviser very very much!
3- Allowing for more inquiry in my classes: I sometimes get carried away with how much content I have to teach in my IB DP classes, and would like to better plan my lessons to allow for further inquiry. In my MYP classes, I do sometimes stress about the content I have to cover and miss out on plenty of opportunities for further inquiry, even though the MYP class should not be so content-heavy. However, I have a rigorous curriculum I have received upon arrival and there is an expectation to go through ‘most’ of it.
Action plan to support my professional development:
1- Undertake MYP training as soon as possible: I enjoy online IB training modules and need to undertake MYP training soon to allow me to improve my instructional and assessment methods in the MYP classroom.
2- Continue building my library of instructional videos for IB DP Economics: I believe I need to make more used of flipped teaching methods to free up class time for further inquiry, and this means I need to update and add to my library of instructional videos on YouTube (an example of a playlist is here).
3- Attend a workshop or undertake an online training module on incorporating inquiry in teaching IB DP Economics: I believe networking with other teachers and see what they do to incorporate inquiry in the DP classrooms may benefit me a lot and give me plenty of ideas.
This Friday is the end of my first trimester at St. Timothy’s School and also my three month-iversary since arriving to the US. Here’s to another great trimester!
I have been teaching in iPad classrooms for nearly 18 months now. During the first few months, the biggest obstacle I faced was creating an efficient workflow between myself and the students. By ‘workflow‘ I am referring to a system that enables the teacher to easily distribute tasks to the students, collect that work back from students, and efficiently give them feedback on their learning. Initially, I would e-mail the students the task sheet, then they would download it and open it in another ‘app’ that allows them to work on it. Once finished, the students would e-mail me the work back. Lots of e-mails got lost, or my e-mail became too hard to organise and manage. Also, students could not e-mail big files like videos they’ve been working on. Additionally, having to e-mail all feedback to students was not fun. Basically, an iPad workflow that relies mostly on e-mail can be a big headache (in my opinion, at least).
Towards the end of 2012, Edmodo introduced a wonderful new feature to their iPad app: the ability to import a document from any iPad app into Edmodo, and hence upload it to your Edmodo Library. This was a great update, and many teachers got excited about it. This meant that now I can use my iPad to upload handouts/task-sheets and then attach them to an ‘assignment‘ post on Edmodo. It also meant that students could download these task-sheets/handouts, work on them in another app, then upload them back onto Edmodo to submit for an ‘assignment’ post. I quickly started using Edmodo in that manner with my year 8 Humanities class. It was great!
All minor tasks and major assessments were assigned through Edmodo, whereby the students would download the task-sheet, work on the assignment in the designated app (Pages, Keynote, iMovie, Notability and Skitch are the most popular in my classroom), then submit their finished product back on Edmodo. Once all assignments are submitted, I then download each student’s submission, mark/grade their work and give them the numerical grade and feedback comment all on Edmodo. The same applies for Edmodo Quizzes: the students can solve them on Edmodo, and view their answers and marks/feedback on Edmodo. In short, Edmodo offers a very efficient, manageable and free workflow system for teachers in an iPad classroom: teachers can easily distribute work to students, collect work back, mark/grade it and give feedback all on the one platform! Below are some annotated screenshots of all the great things Edmodo helps me accomplish in my classroom:
However, I quickly realized that I also wanted my students to collect all that work they’re doing into one easily accessible ‘portfolio’, as opposed to it just being on the other apps, and then submitted on Edmodo. This is where Evernote has been a great help. Any student-created Keynote presentations, Pages documents, annotated PDFs, and annotated photos that the students submit on Edmodo, they can also export to Evernote (in their ‘notebook’ which they ‘share’ with me). I always ask my students to export and submit everything in PDF-format as it preserves the formatting of the document. Once I mark the assignment on Edmodo, the students take a screenshot of the feedback comment and the numerical grade. These screenshots are then added into the same note on Evernote where they attached their work in PDF format. An example of this is shown below:
Since the students had free accounts on Evernote, I could view everything they added into their ‘Shared Notebook’, but I could not modify or edit any notes. Therefore, by the end of the first term of this year, I decided to trial having a premium account. I created a notebook per student, and shared it with them. Since mine was a premium account, that allowed the both of us to edit and modify notes. We continued to use both Edmodo and Evernote in the same way, however I could now leave my feedback directly in their Evernote notebook for the minor activities finished in class, and use the Edmodo ‘Assignment’ feature for the major assessments. One way by which these shared Evernote notebooks have also been a great help is how I use them to give feedback on quizzes completed on Google Forms. I often create quizzes and tests on Google Forms for my students to complete. The students would access the quiz/test through the URL that I post on Edmodo, and take a screenshot of their filled-in forms before clicking ‘Submit’. I would then open the form responses in spreadsheet-format, copy each student’s ‘row’ of responses and the row of questions, and paste both into their workbook along with my feedback and mark. Here is an example:
I have also previously written feedback notes in the students’ shared notebooks where I would attach a PDF rubric, and an audio-note along with the numerical marks. I usually do that at the end of every term. Here is an example of that:
To conclude, Edmodo and Evernote together have really helped me setup an efficient and manageable workflow for my iPad classroom. All tasks can be distributed through Edmodo, downloaded by students from Edmodo into other apps, submitted or ‘turned-in’ through Edmodo, marked/graded on Edmodo, and students can even receive feedback on Edmodo. I would definitely direct any teacher interested in finding out more about it to the ‘Edmodo Help-Centre‘. Furthermore, Evernote has been a great help in allowing the students to collect all this work (along with the feedback received on it) into the one place in the form of a portfolio. Below are some screencasts explaining certain how-tos associated with my workflow, and a screencast giving a tour of my one of my students’ shared notebooks.
I write a lot about the iPad. This is because we’re an iPad school and I’m an eLearning leader. However, luckily, we’re also a Google school! Our school has signed up for the Google education suite years ago, and every staff member and student has a gmail account. Thank the heavens!
Google Apps for Education offer a very wide range of apps that can make the learning process more engaging, meaningful and interactive. I am a Google-addict and I encourage all teachers to integrate each of these Google products in their classroom, one way or another!
1- Google Docs: Wikipedia defines Google Docs as “a free, Web-based office suite and data storage service offered by Google within its Google Drive service. It allows users to create and edit documents online while collaborating in real-time with other users”. The applications of this service in the classroom are endless:
essay-writing tasks: if a student is asked to write an essay, they can set up a Google Document and share it with the teacher. The teacher can give feedback in real-time during the drafting process, and the student can invite another classmate to give peer feedback. This way of setting up the task emphasizes the PROCESS of writing the essay, and not just the final PRODUCT.
student presentations: if a group of students have a presentation together, they can set up a Google Presentation and collaborate in real-time to create it.
2- Google Drive: is Google’s file storage and synchronization service. Google Docs is now a part of Google Drive. This service allows sharing all sorts of files with the students, whether they are worksheets or handouts or templates etc… Students can also upload files to share with the teacher such as completed work to be graded/marked etc…
3- YouTube: is a video-sharing website that was recently acquired by Google. There are many teachers who bring YouTube videos into their classroom, whether to help explain a difficult concept or to illustrate with examples or to spark a debate. However, I believe 21st century teachers should now be pushing students to become content providers, and not just content recipients. A teacher can easily set up a class YouTube channel for students to upload the videos they created, whether they are filmed drama performances, or screencasts about educational topics. YouTube also offers a range of security options, so videos can be set to either public, or unlisted or private, and thus the students’ safety is not compromised. Here is a link explaining the many ways YouTube can be used in the classroom.
4- Google Sites: as defined by Wikipedia, Google Sites “is a structured wiki– and web page-creation tool offered by Google as part of the Google Apps Productivity suite”. A ‘wiki’ is a collaborative website in which users can add, edit or delete content via a web browser. There are many ways a teacher can use wikis in the classroom:
Student portfolios: a very common way I have observed of using Google Sites in the classroom. The teacher would set up a Google Site and give each student a page name where they upload and embed evidence of the learning process. Students can add video (embedded from YouTube), audio, pictures, text, hyperlinks and documents/files (embedded from Google Drive). Alternatively, each student could create their own Google Site as their portfolio and have a page for each learning objective for which they have to demonstrate evidence of learning.
Revision notes: I used a wiki last year to allow the students to collaborate in preparing revision notes for the final exam. Each group of students were given a chapter to summarise and collect/create revision material for, and a corresponding page on the class revision wiki.
Resources website: A teacher can set up a Google Site for a specific unit of work or theme that the students are interested in and the class can add educational content to build an educational resources website about that topic/unit/theme.
5- Google Blogger: is Google’s blog-publishing service. A ‘blog’ is essentially a journal of entries (or ‘posts’) that are displayed from most to least recent. Blogs can be used for discussions, posting information for parents and/or students, student portfolios, collaborative projects and reflective journals. The teacher would have to set up the blogs for either individual students or groups of students, since Blogger has a minimum age requirement for setting up blogs. A blog can also be set up if the teacher wants to flip the classroom. I would normally post a video along with a discussion question and an embedded Google Form to help with my formative assessment and to check students’ understanding.
While these are not the only products Google offers as part of its educational apps, these are the ones that I love the most. These apps can be seamlessly integrated and combined together to create a classroom environment that encourages creation, collaboration and communication, while also allowing for the collection and collation of evidence of the learning process.
I bought my iPad about eighteen months ago. I have said it before, and will say it again: it has changed my life! As an eLearning leader, one of the most common complaints I receive from staff is that “it is really hard to stay organized with the iPad! Everything is all over the place!” I could not disagree more. I have developed an arsenal of strategies and apps to help me stay organized (in addition to the standard Calendar, Mail and Reminders apps):
1- Curriculum-design (unit-planning): I use Pages to help me stay on top of curriculum design. Once I import into Pages the blank template for the MYP Unit Planner, I just reproduce copies of it for every unit of work I need to plan. I also organize my Pages app into folders according to subject or year level or function.
2- Lesson-planning: I use Evernote to plan my lessons. I have set-up a notebook called ‘Work’ (not a very creative name I might add) and I have a ‘note’ in this notebook for every class. Since my drama lessons are weekly double-periods per class, I just write the week number and then write the learning objectives, learning activities, resources and assessment activities for the lesson/week. By the end of the term/semester, I end up having a journal of lesson-plans.
3- Documentation: I use Evernote to document evidence from my lessons. At the end of every class, I take a quick snapshot of the whiteboard and add it to my lesson-planning note for the class. If the students did brainstorms on poster paper, I would take photos and add them to the note as well. If students used some sort of Web 2.0 tool during the lesson, I would take screenshots of what they produced (for example: results from a Google Form, or a typewith.me document etc…) Other things that I can often document are photos of rehearsals, or short audio recordings of anecdotes from the lesson etc…
4- Reflection: I add a very short reflection to my Evernote lesson-planning after every lesson. The reflection I write highlights what we managed to finish during that lesson, what I need to keep in mind for the next lesson, what sort of behavior-infractions I observed and how I responded to them, and what sort of positive behaviors I have observed and praised/rewarded. Sometimes, when my reflection is too long to type, I just record it as an audio note through Evernote.
5- Attendance and Assessment records: I use Numbers to keep my attendance and assessment records. One thing I love about Numbers is the many different sorts of cell-formats you can have: checkboxes, pop-up menus, star-ratings, sliders, steppers etc… At the beginning of the year, I design a template that will include all the assessment columns with the appropriate format, as well as an attendance sheet. Then I would reproduce copies of that template for as many classes as I have and add the students’ names to the template. Once student names are added, you can view every student’s ‘form’ as just one card of all their assessment and attendance records, which can be very useful for quick data input of formative assessments in class while observing students. It’s fantastic!
6- File-sharing and printing: many teachers initially complained that the iPad does not have a USB port. I recommend Dropbox as a very easy solution to this. Just set it up, for free, on your desktop computer or laptop, and copy/paste all of the files you need into Dropbox. Then you can access them from your Dropbox iPad app. Dropbox also allows setting up shared folders between teachers and students (to exchange handouts/worksheets or submitting student work), or between collaborating teachers (to share resources). Read this post about Dropbox and how to make the most out of it. Many teachers also complained about the difficulty of printing from the iPad, especially because our school wifi network does not allow AirPrint. Initially, I used to remind them of the need to cut down on paper consumption and advise them to e-mail whatever they really need to print to their e-mail address and then print it from a laptop/computer. Now, with the iOS 6 update, it’s easy to just get a document from Pages/Numbers/Keynote and then open it in another app, e.g. Dropbox. I often export the document as a PDF to Dropbox, which then pops up directly on my laptop so I can print it from there.
7- Marking and grading: when the students send me work, I often ask to receive it as a PDF (most apps allow exporting as PDFs). Then I use Notability to add my annotations, comments and grade/mark their work. Notability also allows recording audio onto the document, which is a feature I use to give oral feedback on the work for every student.
To conclude, I must mention (and it goes without saying) that this list is not exhaustive and these apps are not the only ones suitable for these tasks. I am merely sharing what works for me and how I personally use my iPad to stay on top of lesson-planning, curriculum-design, attendance and assessment record-keeping, file-sharing, marking and grading, as well as reflecting on and documenting evidence from my lessons. Please feel free to recommend other apps and suggest different uses by leaving a comment below! Happy iOrganizing!
Differentiated learning is at the heart of my teaching philosophy. I believe teachers need to make a conscious effort to embrace all learning styles in their instruction, and to embed these learning styles in their assessments. I also believe the iPad makes doing so much easier, as it has for me. The iPad, and its enormous range of educational apps, offer multiple ways of teaching. Additionally, a very wide range of creation-apps means that students can create and produce content that suits and caters for their preferred learning style.
Differentiation needs to be equally embedded in assessment as it is in teaching. Students should be given opportunities to demonstrate their learning in a manner that suits their preferred learning style. Giving students tests under exam conditions is not always the ideal way for many students to demonstrate what they have learned. I have argued in an earlier post that teachers need to make more use of alternative assessments and achieve more of a balance between assessments for learning and assessments of learning (which appears to be a lot more prevalent to me). While my main timetabled subject is Drama, I also teach Humanities, English, ESL and the Business Studies. I would like to see more of the assessment practices used in drama in those non-drama classrooms. I have been making an effort to do so myself in my non-drama classes.
I am a big fan of portfolio assessment. The iPad allows the documentation of learning all throughout the learning process, not just the final product, which is exactly what portfolio assessment is about. In the drama classroom, my year 7 students can use their iPads in every stage of the drama process:
Planning : a huge variety of brainstorming and mind-mapping apps can be found in the App Store. My favourites are: iBrainstorm and Idea Sketch. Students collaborate in their groups called ‘theatre companies’ (which work very well for the people-smart/interpersonal learner) to brainstorm for their performance based on the prompt assigned or the task given, and then take screen-shots of their brainstorms to share so that each can document evidence of brainstorming in their portfolios (I use shared notebooks with every student through Evernote). This works perfectly for the more visual learners. However, some learners prefer to talk during their brainstorms and keep recorded audio clips on Evernote as evidence of brainstorming, or hyperlinks to an uploaded ShowMe where they screencast their brainstorms (works well for auditory/aural learners).
Preparing: the second stage of the drama process requires students to transform their ideas into writing a script or preparing a storyboard. Students can use Evernote or Pages for writing (if they are more word-smart, verbal or linguistic learners), or Storyboards app for preparing a storyboard (if they are more picture-smart or visual learners). ShowMe can also be used to prepare storyboards where students sketch-and-talk how they will go about their performance. Again, whatever is prepared has to be documented in their Evernote portfolio, whether as a note for their script or an embedded screen-shot for their storyboard, or hyperlink for their ShowMe.
Rehearsing: I believe the iPad has been most helpful in this stage. Students use the camera to take pictures during their rehearsals or to keep video footage. Watching video footage of their rehearsal allows them to see themselves (very useful for the visual learner) and facilitate reflection and evaluation (for the intrapersonal and reflective learner), so that they can brush up their performances before delivering them to a wider audience. Pictures can easily be embedded into their Evernote portfolio. If videos are kept, the students can upload them onto the class YouTube channel and add hyperlinks to their portfolios. Students can also choose to fill-in this Rehearsal Log and either screen-shot it or attach it to a note in their portfolio.
Performing: the students are expected to document their performances through taking video footage. These videos are taken primarily to facilitate student reflection, self-assessment and self-evaluation. Students also use these videos to evaluate their peers. Again, those videos can be uploaded on the class YouTube channel and hyperlinked in their portfolios.
Reflecting & Evaluating: students are expected to keep record of their reflections, either in written format (for the word-smart/verbal learner), or oral format (for the auditory/aural learner). Written reflections can automatically be typed in Evernote, and oral reflections can be recorded and embedded right through the Evernote iPad app. I also make sure there is some sort of structure or framework for reflection, so my students use the reflection help-sheet as their guide. Additionally there are many templates that I use for reflection and evaluation and I can easily share them with my classes through Evernote. The students can then take a screen-shot of the template and write over it in Skitch, which can then be embedded into their Evernote portfolio.
Additionally, there are multiple opportunities for students to create media-rich and authentic content in the classroom, whether they use iMovie to create trailers for their performances throughout the semester, or audio podcasts of tips for actors/directors/writers, or screencasts of theoretical material to teach other students and document their learning, or sound effects and background music using GarageBand, or photo collages of their group work, rehearsals and performances using iPhoto or FrameMagic.
While I have described my portfolio assessment practices in the drama classroom, along with my attempts to differentiate to cater for all learning styles, I believe such practices can be replicated in any other subject area. Whether it is video footage of experiments in Science class, audio podcasts of book reviews in English class, screencast videos to explain complex mathematical theories in Maths class, I believe the iPad can be used to differentiate assessment practices. All that needs to be done is to view learning more as a process, and not just the final product, then find ways to document evidence of as many steps of that process as possible.
To conclude, I believe the iPad can be used to teach across all levels of the Bloom’s Taxonomy, with a very wide range of opportunities to create (the highest level of thinking on the revised Bloom’s Taxonomy). Additionally, it can be used to differentiate teaching to cater for all learning styles. However, it is not enough to just use it to differentiate our teaching, our assessment practices need to also be differentiated and the iPad can facilitate this differentiation.
Update 25/05/2013
I delivered a presentation at the ICTEV 2013 conference about this, you can find the PowerPoint I used here.
So, every school now is rolling out their own BYOD and 1-to-1 programs. Mobile learning (mLearning) is the new black! Whether it is just a fad or not, mobile devices change the way the class runs, and they change the way students learn. Many teachers, from my experience, cite too many problems with using iPads in their classroom, most of them related to classroom management. As an eLearning leader, I get a lot of questions like ‘how do I guarantee the students are on-task?’, or ‘how do I make sure they don’t play games?’, or ‘how do I make sure I can maintain their attention when I need it?’. Reality is, these devices can be very distracting to adults even, let alone school-aged kids and teens. I have gathered a bunch of tricks throughout my teaching experience that I would like to share:
1- Set clear expectations: a lot of classroom management challenges can easily be overcome by setting clear guidelines and expectations for iPad use. Regularly remind your students of the school’s mobile learning policies and ‘acceptable use’ policies. Communicate your expectations about iPad-use at the beginning of every task. Simply saying ‘I expect you to be working on this app until you submit the work and receive my feedback’ will keep most students on-task. Also, talk to them about trust and how you ‘trust’ that they know what they should be doing. I would also advise teaching a clear non-verbal signal that means ‘put your iPads down and give me your full attention’. Ringing a bell three times, for example, is the signal I use.
2- Let go of control: mobile devices can be distracting and they can empower students to do many things, and that challenges the traditional role of the teacher as the centre of the students’ attention and the main source of knowledge and information. Introducing personal learning devices like the iPad can make learning messier and noisier, but that does not mean that the learning is not happening. Fact is, education shouldn’t be about teacher-control anymore, teachers need to embrace their roles as ‘facilitators’ and ‘managers’ more.
3- Differentiate the task: if a student is disengaged from a task and seems to be easily distracted, ask them for reasons. It might be that he/she doesn’t want to type an essay using Pages, but rather prepare a screencast using ShowMe? It might be that they prefer using another app that accomplishes the same thing you requested, not the app you recommended? Give the students options and choices about how they can go about and demonstrate their learning.
4- Explore gaming: see how you can bring gaming into the classroom. Students often feel like school content can be very disconnected from their lives. Lots of teachers talk about gaming as just a waste of time, but fact is there is research that proves the value of bringing gaming into the classroom. Use different characters in games and their voices/body language to get students thinking about characterization in drama, and the elements of a narrative (as a lot of games are based on a story). Think about how ‘Angry Birds’ can be used to teach some concepts in physics. Use scrabble-like games in English classes. Whatever the subject, I’m sure you can find one or two games to relate. Additionally, those games need not take up the whole lesson, they could just be quick warm-ups or even rewards for students who finish early but still produce high-quality work (i.e. whose work is not just rushed so they can play games).
5- Assign group roles: the iPad is meant to encourage collaboration, and I am a big proponent of collaborative learning. When I run a lesson that requires the iPad, I design the task so that only one group member needs their iPad, then I would rotate that group member in consecutive tasks (so that other students also get to use their iPad). For example, in a brainstorm task, I would give the questions to the group and ask them to brainstorm on a poster paper (to be hung up in class) while one group member is responsible for reporting the group’s findings on a typewith.me pad or Google Form. Additionally, you can pick another group member to visualize the brainstorm on a mind-mapping app. It’s easier to manage an iPad classroom when only a few students are holding the iPad at a time, not the whole class.
See if you can design tasks where all group members can work on different stages using their iPads. For example, one group member brainstorms with the group using their iPad. The next group member is responsible for taking photos and documenting rehearsal. The following group member is responsible for shooting video of the performance and uploading it on the class YouTube channel, and so on. Each group member is also responsible for uploading or embedding the evidence they collect onto the group’s shared blog or Evernote shared notebook, or any other form of group portfolio, so that they can all have the same evidence to document their learning. Also, you can design the task so students each work on a part and pass one iPad around, while doing something else when they are not holding the iPad. I have found that it is easier to manage the class and ensure that they are on-task when I can only see five or six iPads around the room at a time (in a class of 25 students).
6- Circulate around the room: I have seen many teachers who like to teach from their desk. I personally believe this cannot be done with iPads in the classroom. I believe the teacher must walk around the classroom and circulate often when students are working individually. That gives the students the idea of ‘teacher-with-it-ness’ and encourages them to be on-task. Also, arrange the classroom in a way that allows all or most devices to be in view.
7- Prepare backup plans: last semester, I designed a really cool rubric using Numbers (the spreadsheet app). The students were to use this rubric to assess themselves. I uploaded the file on Edmodo, shared it with the class and thought everything was under control. However, many students couldn’t open it because it required the latest version of Numbers, which many of them didn’t have (students don’t always regularly update their apps and their iOS software either). Luckily, I had a few printed copies. Technology does let us down sometimes. The most important thing is: don’t panic in front of students and relax, show them that you control the technology, not the other way around.
8- Use games as an incentive: many teachers I meet disagree with this approach, but I still firmly believe in it. We have to teach our students that there is a time for work and and a time for play, and we need to model that in our classrooms. I always tell my students that they can have free-time to spend on their iPad when they finish their work and it is of ‘high quality’. That ‘high quality’ disclaimer is to encourage them not to rush to finish the task, and it reserves room for your judgment on the quality of their work. I often try to find one or two things they can do to improve their work first before allowing them that free time on the iPad, or even nicely asking the student who finished to help another struggling student for a few minutes first before getting free time.
9- Teach responsibility: ultimately, we need to teach students to be responsible for their own learning. Mobile devices empower the students with a lot of tools that can be useful for learning, but at the end of the day, they have to make the choice of learning or not. I constantly remind my students that ‘I’m responsible for my own teaching, you are responsible for your own learning’. Talk to them about making choices and the consequences of these choices. If they allow themselves to get distracted, ask them to give suggestions for helping them stay on-task, so they feel they have more responsibility over the situation.
10- Use ‘Guided Access’: I have never used ‘Guided Access’ in my class because it is the last resort in my arsenal of strategies. Basically, ‘Guided Access’ is a feature that came with the iOS 6 update where you can disable certain hardware buttons on the student’s iPad (like the home button and lock button for example), and also keep the student focused on one app or one part of the screen. I would advise that you only resort to this strategy when all else fails, and only with the most challenging student/s who just can not stay on-task (keep in mind that this strategy does not teach responsibility and trust). You can also disable the touch-screen through ‘Guided Access’ if you just want the student to focus on reading. Remember to always give a warning first to the student before you resort to ‘Guided Access’. A lot of students fear losing full control over their iPad when you warn them that you will resort to ‘Guided Access’ if they do not stay on-task. Here is a screencast explaining how to use ‘Guided Access’:
To conclude, managing a classroom that uses iPads or other mobile devices presents challenges that are different to traditional classroom challenges. I am constantly seeking suggestions, ideas, and practical tips from other teachers, so please feel free to leave a comment. Happy iPad-ing!
Assessment is a recurring theme in my blogging. I think that is because it was my biggest challenge when I started teaching. I wrote before how I thought that teacher-training programs do not prepare us sufficiently for our role as assessors as they do for our role as teachers. This blogpost will focus more on self-assessment and how I came to use it in my classroom. I am now a lot more comfortable with my use of student self-assessment in class, but it didn’t start as such. I would also like to invite other educators to comment and suggest other ways to fully capitalize on the benefits of student self-assessment.
The context is a unit of work on improvisational theatre for my year 7 drama classes. I always post the main content on the board for every lesson (imagine writing this four times a week for about six weeks!). Below is a copy of the whiteboard with the main learning material posted on it. Basically it is a simplified list of the features of the best improvisations and what the best improvisers do. We refer constantly to those two lists when the students give each other feedback on their performances, and when the students assess and evaluate their own performances.
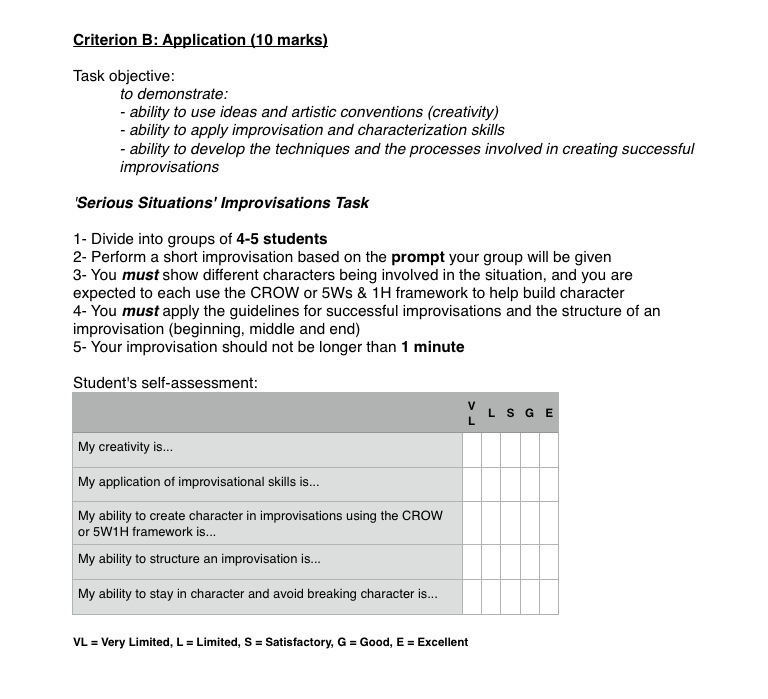
After having practiced improvisational skills for about five or six weeks through playing various improv games and theatresports, the students are given this task sheet that will be used to assess Criterion B (Application). They are told that this MYP Arts criterion is used to assess ideas, skills, techniques and processes. The students are then given a prompt for their improvisation, and the performances are filmed. After all performances, the students watch the video of their improvisations and then use the checklist in the task sheet to assess their performance.
The last step required of the student is to use the self-assessment column in the rubric below to give themselves a mark out of 10 for Criterion B (Application).
Last year, this process was already in place for me. However, I didn’t really know what the next step should be. I didn’t know how to fully bridge the gap between the student’s self-assessment and my own teacher’s assessment of their work. I did a lot of reading and professional learning on assessment, and I finally came across a fantastic alternative assessment tool: conferencing with the students. It seems very common-sensical, but in actual fact it wasn’t for me.
What I learned to do after the students use the checklist and the rubric to assess their work, is to conference with each one of them. I use this 2-3 minute chat (which I build into class-time), to probe further reflection. I ask questions such as: “Why did you give yourself this mark? What suggestions for improvement do you have for yourself?”. I also constantly remind them to refer to the guidelines for successful improvisations/improvisers written on the whiteboard for their oral reflection during the conferencing. Students are often (though not always) quite capable of evaluating their own work and formulating their own feedback for improvement. Of course, you will come across the students that under-assess themselves and those that over-assess themselves. I always remind the ones that under-assess their work that they are being too hard on themselves and focus on highlighting the positive aspects of their work. I also probe further reflection from those that over-assess themselves and ask them to see how they can improve. Using their performance, checklist, rubric self-assessment and the conference, I finally arrive at my own teacher-assessment, which I add to their rubric in the teacher assessment column, reminding them to use this discussion in the conference as their feedback for improvement.
I am now much more comfortable with the way I administer the task and assess the students, and with the way I allow students to assess themselves and evaluate their own work. However, I believe there is always room for improvement. I would like to invite teachers and educators to share their thoughts, views and suggestions.
Drama is a very powerful learning tool. There is lots of academic research in education to back this statement up. I will not be presenting arguments to back it up in this post. What I will be discussing is how I made use of drama, as a learning tool, in the other subjects that I teach (other than drama).
I have always been passionate about theatre and drama. But one thing frustrated me: a lot of the theatre programs I participated in, whether as a teacher or a student, were more focused on the show than on the learning experience for the participants. My passion for drama was a lot more educational than it was artistic. Maybe that is why I did not really feel that a career in theatre is what I wanted (and I did experiment with that path for a short period of time).
Also, I wasn’t just satisfied with a career as a drama teacher. I wanted to bring the educational benefits of drama into other subject areas. I wanted to find ways of integrating drama more into other curricula. I set out on a quest to find out how, and I experimented with a lot of tools. This is a post I wrote to share my experiences.
Firstly, there are a lot of theatre or drama conventions/strategies that drama teachers generally use with their students to help them analyze text to build character and to understand motivations and objectives. My first experiment with taking these tools outside the drama classroom was with conscience alley in my year 10 humanities class in 2011. This technique or convention requires students to form two lines facing each other (i.e. an alley) and one student plays a character facing a dilemma or a difficult decision. The student-in-role then walks through that alley, whilst being bombarded with advice and conflicting arguments. I used this technique to explore the motivations the Muslims may have had for invading Spain in the Middle Ages. One student stepped into the role of the Caliph at the time, while the dilemma was ‘to invade Spain or not to invade Spain’. The students had to quickly read through the text and come up with arguments for and arguments against invading and bombard the Caliph with their arguments as he/she walked through the alley. This activity was then used as a basis for a reflective journal entry in which students had to weigh up the arguments and solve the dilemma. The students thoroughly enjoyed the activity and were very engaged, and I believe the activity improved their arguments in the journal entry. They even requested more similar activities being brought into the humanities classroom.
Later on, I experimented with hot-seating, where a student would step into the role of one of the historical figures studied, and be interviewed by the class in a sort-of press-conference-setting. This activity requires the students to have some good background information about the historical figures, but also there is a lot of room for creativity and just having fun with improvisations. Mantle-of-the-expert was yet another drama strategy that I used in the same unit of work about the ‘Islamic History of Spain’. The students studied the achievements of the Islamic world during the Golden Age of Islam, and so some students were assigned the role of a panel of experts from the various fields of achievements (astronomy, mathematics, geography, agriculture, poetry etc…). The class would then interview that panel of ‘experts’ about their contributions to the Golden Age of Islam.
This year, I used thought-tracking to explore the thoughts and feelings certain characters may be having during certain parts in a novel studied in my year 8 English classroom. A student would be asked to step in role and voice the thoughts and feelings of the assigned character at a certain stage in the novel. I also made use of the other drama strategies mentioned earlier, and I noticed a much higher level of engagement from the students and deeper reflections when these activities were used as a stimulus for journal-writing.
Earlier this year I designed an assessment framework (as part of my masters) that relies wholly on drama strategies as a stimulus for speaking and writing, and to assess reading and listening. This was when I came across this fantastic resource: Joe Winston’s book ‘Second Language Learning Through Drama’. I would highly recommend it for any teacher interested in integrating drama more into their classroom, even if they do not teach drama. I also found the Swansea Grid for Learning literacy resources to be very useful, especially this leaflet.
The advantages I observed of using drama as a learning tool in the classroom are:
Engagement: I noticed students were a lot more engaged and interested in the material studied, even if they did not necessarily want to participate in the drama activity, they were still keen to watch their classmates perform.
Kinaesthetic learning: these drama strategies require a lot of movement and can appeal more to students that get restless when sitting down and writing for too long.
Great stimulus or prompt for a writing task: as it allowed students to dig deeper into the text and actually step into the role of the characters or historical figures, which improved their understanding. This was in turn reflected in their writing.
A practical and authentic formative assessment tool: to see whether or not the class have understood the content or the text.
However, there are challenges that teachers should be aware of:
Not all students will be keen to participate at first: of course, not everyone likes to perform because they may be shy or self-conscious. I found that slowing introducing these activities and encouraging students to try their best eventually led to full participation. I told my students that trying something new for the first time is the hardest, like riding a bike for the first time, but the more you do it, the more confident you become at it.
It will often get noisier: I noticed that students get very excited when I apply these strategies in class and this can led to them being noisier. Moreover, the strategies themselves do encourage a lot of talking. Just relax at first and understand that while they are noisy, it does not mean they are not learning. Just be clear about your expectations and set up an easy class signal to get back their attention.
These activities are not a panacea: they are engaging strategies that can be added to a big repertoire of other teaching activities. Naturally, a teacher should have many diverse tools and tricks in their teaching arsenal to appeal to all learning styles, and ensure that everyone is learning.
I hope this reflection on my experiences with drama outside the drama classroom was helpful and that you may take at least one thing out of it. Now, it’s your decision: To Drama or Not to Drama? Maybe set up a conscience alley to help you decide 😉